Blackberry Black Tea Coconut Ice Cream

I have been meaning to review this really yummy tea for quite a while now. I blame my boyfriend; he swiped my can of The Republic of Tea’s HiCAF Toasted Coconut Black Tea Bags and brought it to work with him!


Blackberry Black Tea Coconut Ice Cream


The Republic of Tea is one of my favorite tea companies, their tea is so good! (One of my go-to’s is their Earl Greyer Tea) I also really like their packaging; the tins make it easy to transport and keep the tea bags more fresh than they would be in a box.


Untitled


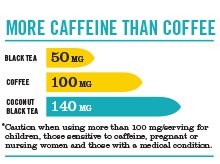
What makes this tea particularly noteworthy is that the caffeine content of this tea is enhanced with green tea extract and pure caffeine isolated from premium tea leaves, so it’s a great morning pick-me-up. This tea also has a natural coconut flavor and a touch of licorice flavor, making for quite the tasty tea! It’s really yummy with a splash of milk. To really enhance the coconut flavor, add a little turbinado sugar to your tea too. (You can now understand why my boyfriend stole this tea from me!) The HiCAF Toasted Coconut Black Tea is also gluten free, carb free, with no added sugars.


I love using tea and coffee in recipes and the flavors of this tea just begged to be used in a dessert! The inspiration for this recipe was a Sunset recipe for a Blackberry-Black Tea Sorbet. Because there is already a flavor of coconut in the tea, I wanted to further enhance that by turning this recipe for a sorbet into a vegan ice cream using coconut milk. 


Making ice cream is really easy but it takes quite a bit of preparation. First, you need an ice cream maker. (Luckily my mom had one!) The bowl of the ice cream maker has to be frozen for at least 24 hours before it’s ready to use. For this particular recipe, the tea bags need to be steeped in the coconut milk, cooled, and refrigerated before making the ice cream. Plus the whole ice cream mixture needs a few hours in the fridge to get cold. Whew!


So, if you’re making this, be sure to prepare ahead!


Ingredients:

Continue reading Blackberry Black Tea Coconut Ice Cream

Charred Corn Salad with Basil and Tomatoes #WhatAGrillWants

Grilled corn is one of my absolute favorite foods of summer. There is just nothing like a cob of sweet corn charred over a grill. Mmm. But as much as I love a simple corn on the cob, sometimes I need a little variety. This recipe from Bon Appetit gives me my beloved grilled corn, plus fresh herbs and tomatoes. What’s not to love?

This recipe also allows me to show off some of my favorite grilling tools, courtesy of OXO. I was sent some grilling essentials as a participant in OXO’s #WhatAGrillWants campaign, including a Corn Stripper, Silicone Basting Brush, and 16″ tongs. I was also sent a Bladed Meat Tenderizer (which I plan on using for steak in an upcoming recipe… stay tuned) and a Little Salad Dressing Shaker that is the perfect size for 2 servings; I will have a post including that little guy soon too!

source: oxo.com


The Silicone Basting Brush is perfect for grilling because it is head resistant, odor resistant, and easy to clean. I used it this time around to rub the corn with olive oil before grilling. The center bristles have circular gaps that hold on to the liquid as you transfer the sauce from the bowl to the food and the tapered outer bristles let you baste easily. Because the bristles are heat resistant to 600 degrees F, it’s a great tool to add an extra layer of barbecue sauce to a protein while grilling! The basting brush is also dishwasher safe.


My boyfriend was most excited about the 16″ tongs. They are stainless steel but have non-slip handles that make them safe for barbecuing. The long length is very much appreciated when working over a hot grill! The tongs also lock closed with a large pull tab that also doubles as a hole for hanging, great for my peg board! (You can also get the tongs in 9-inch and 12-inch sizes).


The corn stripper is the perfect tool for this recipe. I’ve mentioned on here before that I have a (ridiculous) fear of knives. So when trying to strip corn off a cob, I get a bit anxious. This tool makes it SO much easier without the risk! The corn stripper has a container that actually stores the kernels as you strip them from the cob; it holds up to 1/2 cup. You can then just pour the kernels out of the top of the container and you’re good to go! 


Now that I’ve gone through all of my nifty tools that made this recipe a breeze, maybe it would be a good idea to actually share the recipe, no? 🙂

Ingredients:

  • 6 ears of corn, husked
  • 3 tablespoons olive oil, divided
  • 1/2 cup thinly sliced red onion
  • 1/2 cup cherry tomatoes, halved
  • 1/2 cup (loosely packed) fresh basil leaves, large leaves torn
  • 1/4 cup fresh lime juice
  • 1 tablespoon chopped fresh thyme
  • Kosher salt, freshly ground pepper

Continue reading Charred Corn Salad with Basil and Tomatoes #WhatAGrillWants

Roasted Beet Hummus

I am just drawn to the color of beets. They make any dish look absolutely beautiful! I’ve done a couple of other beet dishes on here (Beet Risotto, Gemelli with Brown Butter Beet Sauce, and Roasted Beets with Tahini, to name a few) so when I saw this recipe for Roasted Beet Hummus in the latest Cooking Light I knew I had to make it.

Hummus is really easy to prepare and the addition of the beets makes this one a show stopper. Whip up a batch of this to serve with a crudite platter at your next gathering!

Ingredients:

  • 2 red beets
  • 1/2 cup coarsely chopped walnuts
  • 8 garlic cloves, halved
  • grated lemon rind of two lemons
  • fresh lemon juice from two lemons
  • 1/4 walnut oil (or good olive oil)
  • 1 1/2 teaspoons freshly ground black pepper
  • 1 teaspoon kosher salt
  • 2 (15-ounce) cans chickpeas (garbanzo beans), rinsed and drained

Continue reading Roasted Beet Hummus

Farro Berry and Walnut Salad

This recipe from Cooking Light is actually supposed to be a side dish. But I thought this Farro Berry and Walnut Salad would make a great summer lunch! I have been looking for something that can be made the night beforehand and transports easily so this salad seemed perfect. I added in some blueberries because my boyfriend is allergic to cherries and I wanted him to still be able to enjoy a fruit within the salad (he’s fine with cherries being in something, he just has to pick them out).


Ingredients:

  • 5 cups water
  • 1 1/2 cups uncooked farro
  • 1/2 teaspoon salt, divided
  • 3/4 pound sweet cherries, pitted and halved (about 2 cups)
  • 1/3 cup blueberries
  • 2/3 cup diced celery
  • 1/2 cup coarsely chopped walnuts, toasted
  • 1/4 cup packed fresh flat-leaf parsley leaves
  • the juice of one lemon (about 2-3 tablespoons)
  • 1 tablespoon whole-grain Dijon mustard
  • 1 tablespoon honey (or agave nectar)
  • 1/4 teaspoon freshly ground black pepper
  • 3 tablespoons extra-virgin olive oil

Continue reading Farro Berry and Walnut Salad

Vegan Chocolate Chip Walnut Cookies

I personally am not vegan. But as more of my friends dabble in veganism, I have been getting more requests to do some vegan friendly recipes. I’m honestly finding vegan baking to be relatively easy; most of the substitute ingredients are already in my pantry!

I received a bag of One Degree Organics Sprouted Spelt Flour along with some vegan baking recipes that sounded really tasty! I have never made a vegan cookie before so I appreciated the nudge towards trying and decided to make some Vegan Chocolate Chip Walnut Cookies.

Sprouted Spelt Flour works generally like normal flour, you just need to adjust your dry-to-wet ingredient ratio (less dry ingredients or more wet ingredients). Sprouted Spelt Flour contains more fiber, vitamins, and essential fatty acids than regular flour so it seems like a generally good switch to make. (I’m not giving up eating cookies, but hey, at least I’ve increased my fiber!)  🙂


One Degree Organics prides itself on using only organic foods grown using natural veganic methods for its grains used in its cereal, bread, and flours. The company also does not add any synthetic ingredients and practices sustainable growing methods. One Degree Organics actually includes a QR code and alphanumeric code on each package so that you can learn about where that specific product came from and the family of farmers behind it. Pretty cool right?


So I was really excited to use their Sprouted Spelt Flour in this recipe! Because this is my first time baking vegan cookies, I kept the recipe mostly intact. I did add some walnuts for a bit of crunch which resulted in these Vegan Chocolate Chip Walnut Cookies!

Ingredients:

  • 1 1/3 cup One Degree Organic Sprouted Spelt Flour
  • ¼ cup Coconut Palm Sugar
  • ½ teaspoon baking powder
  • ¼ teaspoon sea salt
  • 1/3 cup + 2 tablespoons maple syrup
  • 1 ½ teaspoons vanilla powder or extract
  • ¼ cup + 3 tablespoons melted coconut oil
  • ½ cup vegan chocolate chips
  • 1/4 cup walnut pieces

Continue reading Vegan Chocolate Chip Walnut Cookies

Vegan Dark Chocolate Cupcakes with Peanut Butter Frosting

I made these Vegan Dark Chocolate Cupcakes with Peanut Butter Frosting for a lovely vegan bride-to-be for her bridal shower this weekend. I’m not going to lie, I was going to do a test run of these, and if I didn’t like them, she was getting normal egg-filled, buttercream-topped cupcakes. But. These are good. Really really good.

So when I did my test run, I passed them around to friends and family and conveniently left the word “vegan” out of the description until after they tasted the cupcakes. My “test subjects” didn’t seem too upset with my experiment, many went for seconds!

These cupcakes use dark chocolate (versus milk chocolate), and have no eggs, butter, or milk. And they are still super fluffy and moist. The best part, most of the ingredients are probably either in your pantry or really easy to find!

Ingredients (makes 2 dozen) adapted from the Curvy Carrot:

Dark Chocolate Cupcakes:

  • 2 cups all purpose flour
  • 1 1/2 cups sugar
  • 1 tablespoon cream of tartar
  • 2 teaspoons baking soda
  • 1/2 teaspoon kosher salt
  • 3/4 cup dark chocolate cocoa powder
  • 2 oz vegan dark chocolate, finely chopped
  • 3/4 cup sunflower oil
  • 1 1/4 cups vanilla almond milk
  • 3/4 cup cinnamon applesauce
  • 1 tablespoon vanilla extract
  • 1 tablespoon cider vinegar

Peanut Butter Frosting:

  • 1 cup creamy peanut butter
  • 1/2 cup vegan margarine
  • 2 cups powdered sugar
  • 1/2 teaspoon vanilla extract
  • 3 tablespoons vanilla almond milk

Continue reading Vegan Dark Chocolate Cupcakes with Peanut Butter Frosting

Apple-Cinnamon Breakfast Quinoa

I know, I know. You probably read the title and thought to yourself there is no way quinoa can be a tasty breakfast. But hear me out. Quinoa, although a great grain to use as a dinner side, can also hold its own as a sweeter breakfast meal. I actually originally made this recipe so that vegan friends who were visiting for the weekend had a breakfast option. (Vegans have a tough time when it comes to breakfast! Oatmeal, quinoa, fruit. I think that’s about it…) Anyways, I wasn’t expecting much. But it was so tasty I made a batch for my breakfasts all week. That’s right, it even reheats nicely!

I found this recipe on Budget Bytes and made some minor changes. Check out her original recipe here.


Ingredients:

  • 1 cup quinoa
  • 1 1/2 cups apple cider
  • 1/4 teaspoon salt
  • 1/2 teaspoon cinnamon
  • 1/4 teaspoon allspice
  • 1 medium apple (I used Fuji)
  • 1/2 cup dried fruit/nut mixture


Continue reading Apple-Cinnamon Breakfast Quinoa

Slow Cooker Marinara

Making a large batch of marinara sauce and freezing it for later use makes dinner on really hectic weeknights significantly easier. My mom used to make pots upon pots of tomato sauce during the first snow of the season which always made the house smell oh so good, especially after coming in from the cold. We haven’t had our first snow yet, but that’s not going to stop me from trying out this slow cooker marinara from Cooking Light. The sauce can be frozen and used for months.

The original recipe used fresh tomatoes but I hate peeling tomatoes and the plum tomatoes this time of year just aren’t very attractive. So I used the next best thing, canned whole peeled plum tomatoes. If it’s summer when you make this, go for the fresh ones!

Ingredients:

  • 3 tablespoons extra-virgin olive oil
  • 3 cups chopped onion (about 2 onions)
  • 3/4 cup sliced carrot (about 2 carrots
  • 1/2 cup diced celery
  • 1/4 cup minced garlic (a good dozen garlic cloves)
  • 1 tablespoon dried oregano
  • 1/4 teaspoon crushed red pepper
  • 2 tablespoons unsalted tomato paste
  • 1/2 cup dry red wine (such as cabernet sauvignon)
  • 3 28 oz cans of Whole Peeled Plum Tomatoes
  • 2 dried bay leaves
  • 2 tablespoons chopped fresh oregano
  • 3/4 cup chopped fresh basil
  • 1 1/2 teaspoons salt
  • 1/2 teaspoon freshly ground black pepper

Continue reading Slow Cooker Marinara

White Wine Sangria Pops

I was at a restaurant on Long Island that had a drink they called a “lushee” which was basically a frozen sangria. And I haven’t been able to stop thinking about it. Pure brilliance. I told a friend about this and we knew we had to make our own, what could possibly be more refreshing on a hot summer day? I was recently sent a cookbook that actually one-upped the concept of the lushee: a White Wine Sangria Popsicle.
The book, Poptails, by Erin Nichols of Erin Cooks, is filled with sixty pops inspired by your favorite alcoholic beverages. Recipes range from classics like a gin and tonic to fancy favorites like a cosmopolitan.  There are even some awesome dessert pops like cherry cheesecake and banana split.  
 
 
I was in love with this book before I even received it. What an amazing idea! Who wouldn’t want their favorite drink in iced pop form? The recipes had me imagining all of the lovely get-togethers I could have: a brunch with iced coffee and bloody Mary pops, a pool party with strawberry basil martini pops, or Christmas in July with spiked eggnog, mulled wine, and Christmas cheer pops. Sigh.
Anyways, I kept thinking back to those lushes and knew I had to try the white wine sangria pops.
I tweaked the recipe within the book a bit. For the original recipe, pick up a copy of this fun book!
Ingredients:
1 bottle white wine (I used Sauvignon Blanc)
1 liter flattened seltzer water
1/4-1/3 cup cranberry juice (I used cranberry hibiscus)
1 tablespoon simple syrup, or to taste
1 pint raspberries
1 pint blackberries
1 pint blueberries                                
Note: You’ll need ice pop molds and Popsicle sticks to make these.

I wanted to start this post with the definition of seltzer, club soda, tonic water, and sparkling water. Because I always manage to mess these drinks up. And no wonder: club soda, seltzer and sparkling water are all water infused with carbonation.  These can all be interchanged. Tonic water is something a bit different, it is still a carbonated water, but quinine is dissolved into the water as well. It’s quite a bit more bitter so be sure to use club soda/seltzer/sparkling water in this recipe. Or for a bit more sweetness, a lemon-lime soda would work.
Make sure to allow your seltzer water to flatten. Don’t forget this step! Unflattened carbonated beverages will explode when frozen. And that sounds like an awful waste of white wine sangria if you ask me. The book suggests opening your seltzer 8 hours prior and popping it into your fridge in a place it won’t spill.
Combine the wine, flattened seltzer water, cranberry juice, and simple syrup. I used lemon simple syrup to give a touch more flavor. Feel free to add some lemon zest to add a little extra.  Add whatever mixture of berries you’d like to the pop molds. I went for one raspberry, one blackberry, and a few blueberries per pop.  Fill each mold ¾ of the way full with the mixture; you need to leave a small amount at the top to allow the liquid to expand.
Note: you’ll have some extra sangria that won’t fit in the pop molds. This is so you can enjoy your creation before waiting 24 hours 🙂
Add popsicle sticks, cover, and freeze for approximately 24 hours.
To remove from the molds, fill a bowl larger than your pop molds with warm (not hot) water. Add the mold to the bowl for 15 seconds then gently pull on the top of the ice pop stock. If the pop does not release, add the mold back to the water for another 15 seconds, repeat this process until the pops come out of the molds.
These pops were refreshing and a little bit tangy. I wanted a bit more sweetness though, I might add more simple syrup next time I make them. I also would add a bit more cranberry juice so that the pops turn a very light pink color, which would probably look really nice.
What’s nice about this recipe is how adaptable it is. You can add or subtract whatever fruit makes you happy. You could use a sweeter wine, or even a (flattened) champagne. My friend made this recipe using white grape juice instead of cranberry.
There are plenty of other creative pop recipes within the pages of this book. I love the element of fun that the popsicles add and can’t wait to try more of these yummy recipes!
White Wine Sangria Pops

Prep Time: 15 minutes

Total Time: 24 hours, 15 minutes

Yield: 8 servings

Ingredients

  • 1 bottle white wine (I used Sauvignon Blanc)
  • 1 liter flattened seltzer water
  • 1/4-1/3 cup cranberry juice (I used cranberry hibiscus)
  • 1 tablespoon simple syrup, or to taste
  • 1 pint raspberries
  • 1 pint blackberries
  • 1 pint blueberries

Instructions

  1. Make sure to allow your seltzer water to flatten. Don’t forget this step! Unflattened carbonated beverages will explode when frozen. And that sounds like an awful waste of white wine sangria if you ask me. The book suggests opening your seltzer 8 hours prior and popping it into your fridge in a place it won’t spill.
  2. Combine the wine, flattened seltzer water, cranberry juice, and simple syrup. I used lemon simple syrup to give a touch more flavor. Feel free to add some lemon zest to add a little extra. Add whatever mixture of berries you’d like to the pop molds. I went for one raspberry, one blackberry, and a few blueberries per pop. Fill each mold ¾ of the way full with the mixture; you need to leave a small amount at the top to allow the liquid to expand.
  3. Note: you’ll have some extra sangria that won’t fit in the pop molds.
  4. Add popsicle sticks, cover, and freeze for approximately 24 hours.
  5. To remove from the molds, fill a bowl larger than your pop molds with warm (not hot) water. Add the mold to the bowl for 15 seconds then gently pull on the top of the ice pop stock. If the pop does not release, add the mold back to the water for another 15 seconds, repeat this process until the pops come out of the molds.
Schema/Recipe SEO Data Markup by Yummly Rich Recipes
0.1
https://icancookthat.org/2012/07/white-wine-sangria-pops-from-poptails.html
                                                                                                                                  

Ratatouille

With the influx of vegetables in my life from my CSA, I am swimming in quite a large amount of highly perishable produce. So to preserve (and use) a bunch of my CSA veggies, I decided to try my first hand at Ratatouille. I looked at a bunch of recipes online and they can get really quite complex! There are some that cook each vegetable separately to bring out the flavor of each, some that layer the ingredients into a beautiful casserole. Well, I’m making this on a weeknight after work. So this is one of the easier versions, a one pot wonder if you will. One day, I will make the other version, but tonight, I just want a delicious meal that I can freeze for later.
So what is ratatouille, besides a really cute kids movie? It’s basically a stewed vegetable dish, usually served with bread, or maybe egg noodles or polenta (something to sop up all the deliciousness). There are many different recipes for the dish, but most include eggplant, zucchini, peppers, and onions. The spices can range from thyme or marjoram to herbes de Provence.
I found this recipe on MarthaStewart.com and kind of messed with the ratio of ingredients, so be sure to check out the original recipe to see if that is more to your liking.
Ingredients:
1/4 cup olive oil (or enough to cover the bottom of your pot)
1 medium onion, chopped (I used a sweet onion)
4 cloves garlic, minced
3 small eggplants,  cubed
2 large zucchini, cubed
Salt and ground pepper, to taste
2 yellow or bell peppers, ribs and seeds removed, cubed (use any color pepper you want)
1 can (28 ounces) diced tomatoes
2 teaspoons fresh thyme
Chopped fresh basil, for garnish

To make, add the olive oil to a Dutch oven or other large pot that has a lid. Heat over medium heat. While waiting to heat, chop your onions, garlic, eggplant, and zucchini.
I want to take a minute to discuss a method of cutting eggplant. I googled this just as I was about to make the recipe so it was new to me too and it worked quite well. I found the method on recipetips.com.
To cut the zucchini, remove the skin using a knife by cutting the zucchini into a square shape (or close to a square.)
Slice the zucchini into smaller square disks.
Stack a few of them, and cut into fours to make smaller squares. This doesn’t have to be uniform, you just want them to be the same general shape so they cook evenly.
Add the onions to the pot and stir occasionally. Cook for 5 minutes.
Add the garlic and cook for another minute. Stir in the eggplant and zucchini and season with salt and pepper. Add 3/4 cup of water, cover, and simmer for about 5 minutes, stirring once half way through. While waiting for the 5 minutes to pass, chop your peppers.
Add the peppers to the pot and simmer, covered, for another 5 minutes.
Add the tomatoes and thyme and bring to a boil.
Reduce heat to medium-low, partially cover, and simmer for 15 to 20 minutes. The recipe said to stir often. I didn’t. I got distracted and walked away. Oh well.
Remove from heat and serve.  Top with a few slices of basil.
If freezing, leave the basil out and freeze.
For being vegetarian, doesn’t this look fabulously hearty?
I paired mine with day old bread which was a perfect amount of crispiness to go with the veggies. It may not be terribly pretty, but it was comforting and really flavorful.
I ate one serving and froze the rest for nights when I don’t have time to cook. I’m glad I did or I’d still be sitting here eating it!

White Bean Hummus

Have you ever had a craving for something that you just can’t shake? Even after eating? I desperately wanted hummus. And even after filling up on delicious pizza I still wanted that hummus. But I don’t have any chickpeas in my place right now. (Note to self: stock up on cans of chickpeas so that I am never in this terrible situation again) So I went in search of a recipe for hummus that I could use something, anything else I happened to have on hand. White bean hummus to the rescue! (I found this recipe in Southern Living)
Ingredients:
2 garlic cloves, minced
1 teaspoon chopped fresh rosemary
1 (15.5-ounce) can cannellini beans, rinsed and drained
the juice and zest of 1 lemon
2 tablespoons tahini
1/2 teaspoon salt
1/4 teaspoonpaprika, plus more for garnish
1/4 cup olive oil

Rinse and drain your cannellini beans.
Add all the ingredients except for the olive oil to a food processor and blend. You may need to stop the food processor one or two times to scrape the sides to make sure everything is evenly blended.
While the food processor is running, add an even stream of the olive oil until well blended. Add to a bowl and sprinkle with some paprika. Serve with pita chips, cucumber, or green peppers.
Due to my craving, I had none of these on hand. Junk. But I did have some of the Kitchen Table Bakers Rosemary Parmesan Crisps that went perfectly with the hummus!
Oh so satisfying.
Cannellini beans make one fantastic hummus, who knew?
The hummus was nice and creamy. And I loved the fresh rosemary!
I’d suggest adding some extra fresh chopped rosemary on top for added flavor. You can store this overnight or for a few days beforehand. I like to bring it with me as a snack at work.

Banana Berry Pecan Granola Bars

There are so many fantastic food bloggers out there. One food blog I regularly check is Cookin’ Canuck. Dara makes the most appealing looking recipes and her photos are always stunning. She has also cooked her way healthy and has a wonderful post about her journey. Dara has a great recipe for Low Fat Granola Bars with Bananas, Dried Cranberries, and Pecans that I just had to try. I switched it ever so slightly, but you can find the original recipe here.
Ingredients:
  • 3 1/2 cup rolled oats
  • 3/4 cup pecan pieces
  • 3 ripe bananas
  • 2/3 cup unsweetened applesauce
  • 2 tablespoons honey (to make vegan, substitute agave nectar)
  • 3/4 cup dried berries (I used Trader Joe’s Golden Berry Blend)
  • 3/4 tsp ground cinnamon
  • 1/2 tsp nutmeg
  • 3 tbsp whole flax seeds
  • 1/2 tsp salt

Winter Lentil Soup

Philadelphia is about to have a full week of weather in the 70s. I think there’s even an 80 degree day thrown in In March! I’m so excited, but I feel a bit stressed because I didn’t get to make all of my winter soups and stews. But who says you need to eat these in freezing weather? So I decided to make this Winter Lentil Stew for lunches in my office when they crank up the AC and I feel like it’s winter.
Ingredients:

4 leeks, white and light green parts only
1 bunch kale  (mine was huge, so I ended up using half)
1 tablespoon olive oil
1 28-ounce can whole tomatoes, undrained
6 cups water
2 sweet potatoes, peeled and cut
1/2 cup brown lentils
1 tablespoon fresh thyme leaves
1 teaspoon kosher salt
1/4 teaspoon black pepper


Prepare all your ingredients. Slice each leek in half lengthwise and then slice into 1/4 inch thick half-moons. You want about 2 cups of half moons.

Add to a large bowl filled with cold water and swish to remove any grit. Drain and pay dry. Lay on a paper towel.

Remove the stems from the kale and then thinly slice the leaves. You want about 3 cups of leaves.

Peel and chop your sweet potatoes. You want them to be bite sized or smaller. Measure out the lentils, prepare your thyme leaves, and open your can of diced tomatoes.

Add a large saucepan to the stove over medium heat. Add the oil and heat.  Add the leeks and cook for three minutes, stirring occasionally. Add the tomatoes and cook for 5 minutes.

Add the water and bring to a boil.

Stir in the kale, sweet potatoes, lentils, thyme, salt, and pepper. Cover, lower the heat, and simmer for 30 minutes or until the lentils are tender.

If freezing, you can spoon into individual containers, let cool, and freeze at this point.

If enjoying immediately, eat as is, or sprinkle with some grated Parmesan cheese.

I can’t wait to enjoy this on my “colder” days in the office!

Chunky Vegetarian Chili

I love chili, and with the warm winter we’ve been having, I didn’t have nearly enough of it. So before spring is truly here, I wanted to make another batch. This meatless chili has so many different beans and flavor, you won’t even miss the meat! I adapted this recipe from Cooking Light, using more peppers, diced tomatoes instead of stewed, and a bit of vegetable broth to thin it out a little.
Ingredients

1 tablespoon olive oil
2 cups chopped onion
1 chopped yellow bell pepper
1  chopped red bell pepper
1 chopped orange bell pepper
2 garlic cloves, minced
1 tablespoon brown sugar
1 1/2 tablespoons chili powder
1 teaspoon ground cumin
1 teaspoon dried oregano
1/2 teaspoon salt
1/2 teaspoon black pepper
1 (28-ounce) can diced tomatoes, undrained
2 (15-ounce) cans black beans, rinsed and drained
1 (15-ounce) can kidney beans, rinsed and drained
1 (15-ounce) can pinto beans, rinsed and drained
1 cup vegetable broth


To make, heat a large pot or a Dutch oven over medium- high heat. Add the olive oil. Add the onion, peppers and garlic.

Cook, stirring occasionally, until tender, about 5 minutes.

Add the sugar, chili powder, cumin, oregano, salt and pepper. Mix to combine. Add the tomatoes, beans, and broth.

Bring to a boil, cover, reduce heat, and simmer for 30 minutes.

That’s it!

A delicious, hearty, meatless meal in 40 minutes.

Serve with corn bread if desired.

I love the colors in this! Look at all those different tones!

The chili looked a little too chunky without the vegetable broth, but if you like it that way, feel free to omit the broth.


Rose-Scented Berry Prosecco

New Years Eve is a great time to add a little bit of glitz and glamor to your life. I, naturally, feel the need to do that to my drink. This is actually a take on a local restaurant’s delicious champagne option. I hope I remember it correctly, but when I first had this drink at Farmicia in Old City Philadelphia I fell in love. It’s such a girly drink so I had to save it for a special occasion.
Ingredients:
Rosewater
Blueberries
Prosecco

Add about 1/2 teaspoon rosewater to the bottom of a fluted glass. I apparently do not own any champagne glasses (who knew?) so I actually made mine in the martini glass with a bit more rosewater.
Add blueberries or any berry of your choice to the glass. If you’re using a traditional glass, three should be plenty.


Open your sparkling wine and pour into the glass, filling to the top.
Enjoy 🙂
I absolutely love the smell of rosewater. The taste can only be described as what you’d expect a rose to taste like (sorry). The berries add a nice little touch too; I love saving them for last!
I’d suggest adding rosewater to taste. I am very fond of it, so I might have a heavy hand with it. Start with 1/4 teaspoon and work your way up.

Have a wonderful New Years!

Exit mobile version