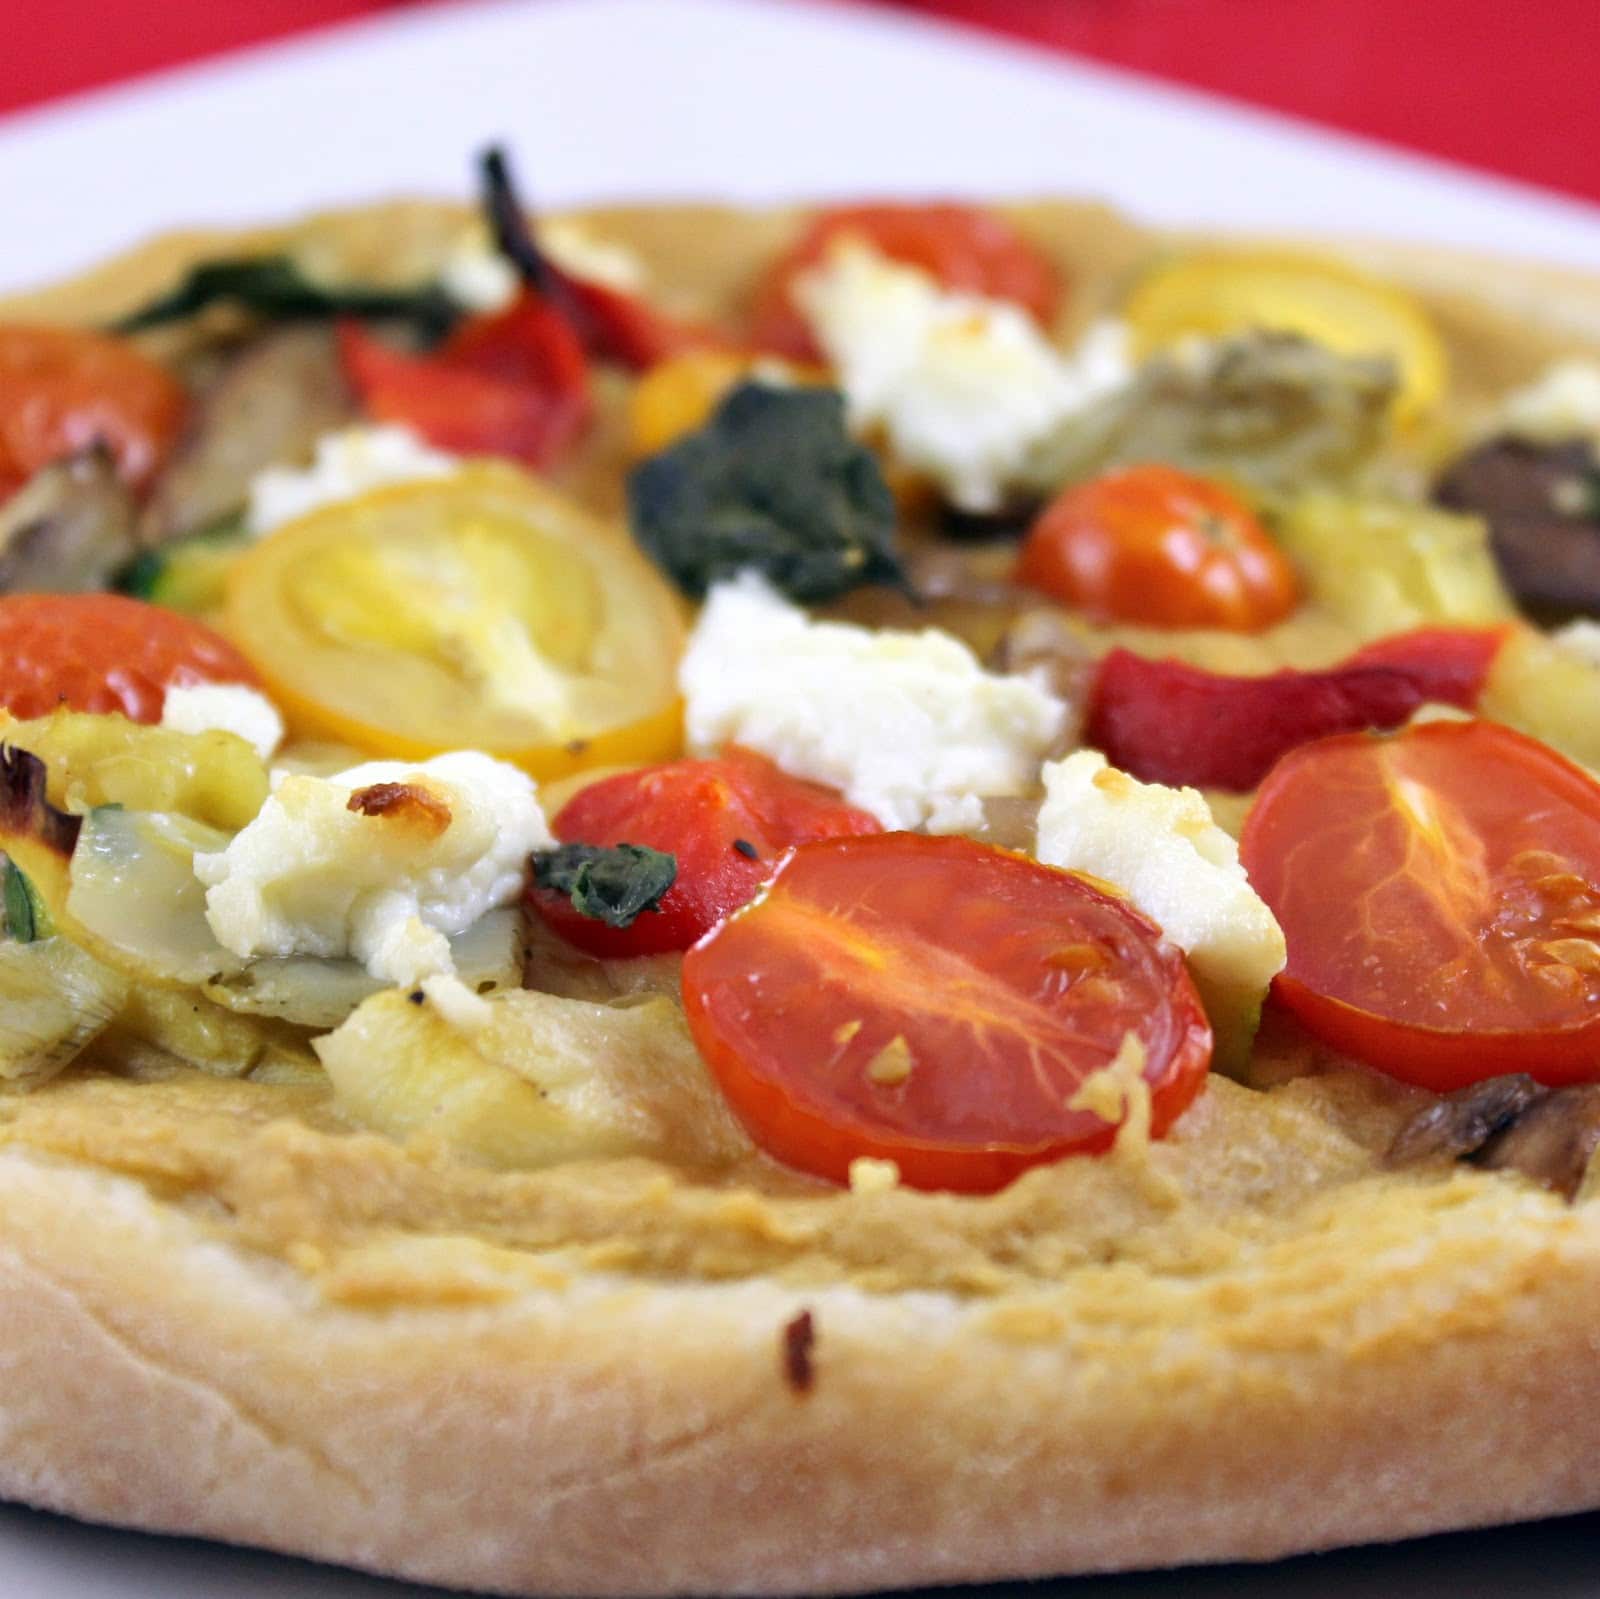
Hummus Vegetable Pizza

It’s no secret that I love hummus. I’ve made quite a few different versions on this blog. So I was really excited when I was given the chance to sample some hummus through the Foodbuzz Tastemakers program. I was allowed to choose any hummus my little hummus-loving heart desired. But, I’ve actually tried them all before. And I’ve loved them all (some more than others, obviously). I decided instead to incorporate the classic hummus into a meal. A coworker gave me an awesome idea: hummus pizza. Brilliant!
Ingredients:
  • Pizza dough (I used Trader Joes)
  • Classic Hummus
  • 1 zucchini
  • 1 yellow squash
  • 1 package of sliced baby bella mushrooms
  • 1 small onion, chopped (I used red because that’s what I had)
  • Roasted red peppers, chopped
  • Marinated artichoke hearts, chopped
  • 1 goat cheese log
  • Cherry tomatoes, halved
  • Salt and pepper, to taste
  • 1 tablespoon olive oil
  • cooking spray

Continue reading Hummus Vegetable Pizza

Vegan Chilled Corn Soup

I had a realization a few days ago that summer is almost over. And the end of summer means the winding down of fresh ingredients. So for the next few weeks, I am going to try to make meals that really highlight all of those in season vegetables (like my post about Fettuccine with Fresh Tomato Sauce). For seasonal recipes, Cooking Light continues to be my go-to magazine. Because it comes monthly, the recipes change with the seasons and freshness of produce. In the September issue, Cooking Light featured seven “Trailblazing Chefs” including recipes from some of the chefs. Chef Brandon Sharp, the executive chef of Solar located at the Solage Calistoga spa resort in the Napa Valley, has a recipe for Chilled Corn Soup that will make the most of summer corn. Plus, its also vegan and mostly fat free, win!
Ingredients (makes 6 servings):
4 large ears shucked corn
4 tablespoons canola oil
3/4 cup chopped onion
6 sprigs fresh thyme, tied in a bundle
3/4 teaspoon kosher salt, divided
1 garlic clove, minced
3 cups water
1/2 cups diced peeled avocado
1/2 cup diced radish
1 tablespoon chopped fresh cilantro
1 tablespoon fresh lime juice
1/8 teaspoon ground red pepper

Begin by shucking your corn. You can buy already shucked corn in the supermarket which will work just fine, just don’t use frozen corn kernels for this recipe. Prepare some of your ingredients: chop the onion, mince the garlic and bundle the thyme.
Using a knife, cut the kernels from the ears of corn. Using the dull side of the knife blade, run the knife back over the cobs to remove the remaining pulp and corn starch from the cobs into a separate bowl.
Heat oil in a saute pan over medium heat. Add the chopped onions, tied thyme, and 1/4 teaspoon salt. It’s best to tie the thyme for easy removal later.
Reduce the heat to medium low and cover. Cook for 8 minutes or until the onions have softened, stirring occasionally. Add the corn kernels and minced garlic, cover, and cook for 4 minutes.
Add the corn starch/pulp, water and remaining 1/2 teaspoon salt.
Turn the heat to medium-high and bring to a boil. Remove from heat and discard the thyme. Pour half of the corn mixture into a blender.
Remove the center piece of the blender lid so that the steam can escape. Place a clean towel or paper towel over the hole in the blender lid to avoid splatters, and blend until smooth. Strain the mixture through a sieve into a large bowl.
Using a spoon, push the liquid through the sieve and discard the solids.
Repeat with the remaining half of the corn mixture. Refrigerate for at least 4 hours.
When you are ready to serve the corn soup, dice the avocado and radishes, and chop the cilantro. Add to a bowl. Squeeze the lime juice over the avocado and radishes. Be sure to get it on all pieces so that they don’t oxidize and turn colors. Add the ground red pepper and mix to combine.
To serve, ladle 1 cup soup into each of 6 bowls, top with 2 tablespoons of the avocado mixture.
The soup was so creamy and smooth, it tasted like it was made with heavy cream. The corn starch/pulp thickens the broth which gives it that creamy quality. The radishes added a nice crunch to the dish, and the avocados add a bit more creaminess and a little bit of good fats to make the dish more filling. I loved the cilantro, it enhances the other flavors. What a delicious soup!

Baba Ghannouj

My CSA share came with eggplant this week. My mind went immediately to Baba Ghannouj, which is sort of like hummus with eggplant substituted for the chickpeas. The eggplant is grilled or baked before pureeing it to give it a smoky flavor. I have never worked with eggplant before, so I used Eating Well’s recipe as a base for my baba ghannouj.

Ingredients:

  • 1 eggplant
  • 2 cloves of garlic (unpeeled)
  • 2 tablespoons lemon juice, plus zest from the lemon
  • 1 tablespoon tahini
  • 3/4 teaspoons salt
  • Olive oil, as needed
  • Pine nuts, optional

Continue reading Baba Ghannouj

Strawberry Prosecco Pops

Coming back to the Philadelphia heat after nearly two weeks in Ireland was a bit of a shock to my system. I was in desperate need for a way to cool down, and what better way than through a cool dessert? Cooking Light‘s Sparkling Strawberry Pops seemed to be the perfect choice. (Please excuse the quality of these photos. I managed to lose the battery charger for my new camera, and am waiting for the replacement to be delivered so these were taken on a pretty crummy alternative.)


Ingredients:
1 cup sugar
1/4 cup water
3 cups sliced fresh strawberries (1 pound) or a 1 lb mixture of berries
1 tablespoon fresh lemon juice
2/3 cups chilled Sparkling Wine (I used Prosecco)

I had to change the original recipe (linked above) a bit because I realized I didn’t have any corn syrup and was just too darn lazy to go out and buy some. This recipe is also halved from the original. You will need to have a Popsicle mold to make these. If you don’t have one, this might also work just as a “water ice” type treat; try just freezing the mixture in a bowl (if anyone tries this, please let me know how it turns out).

To make, combine the sugar and water in a microwave-safe bowl and microwave for 3 minutes or until it begins to boil. Remove from the microwave and stir until the sugar dissolves. It will have almost a corn syrup-like texture. Let cool.


Chop your berries.


Combine the berries, lemon juice, and half of the sugar-water mixture in a food processor and process until smooth.


Using a fine mesh strainer, strain the mixture over a bowl.

Use a spoon to press down on the strainer to help push all the juices through.

This will remove all seeds and any parts of the strawberries that didn’t fully blend.

Discard the solids left behind.

Add the rest of the sugar syrup and the sparkling wine to the strawberry mixture. Mix to combine.

Divide among 4 ice-pop molds.


Cover with tin foil. Using a knife, carefully make a small slit in the tin foil on top of each Popsicle.

Insert a Popsicle stick into each slit (this helps to keep the sticks centered).


Freeze for 4 hours or until frozen.
To remove from the molds, run under hot water for a few seconds to loosen the pops.


These pops were really refreshing. I was never a fan of Popsicles growing up because of that fake fruit taste that they all seemed to have, so the fresh strawberries really added a nice natural taste that I appreciated. This recipe can be adapted to use any berries you prefer, or even a mixture of a few types of berries. I hope these help beat the heat!

Sauteed Pea Tendrils

Pea tendrils (or pea shoots) are the leaves from a snow pea plant. They have a bit of a spinach-pea taste, delicate and very tasty. Before receiving them in my CSA share, I just thought they were used in a stir fry or as a topping. But these little guys are really delicious in a simple saute.

Ingredients:
Pea tendrils
1 teaspoon olive oil
3 garlic cloves, smashed and cut in half
Salt, to taste

Heat the olive oil in a saute pan over medium-low heat. Add the garlic cloves and cook for 2 minutes, until sizzling but not browned.
You can either remove the garlic, or keep it in there to add more garlicky flavor. Add the pea tendrils and salt to taste.
Saute for 1-2 minutes until slightly wilted but still maintaining its shape. That’s it! So simple, so yummy.

Cilantro Lime Hummus

I can never have enough hummus, it is one of my favorite snacks (although I tend to eat so much of it, it’s not really a snack!) I’ve had hummus on the brain for a while now. Be Well Philly must have read my mind, because they posted this great Cilantro Lime hummus recipe that I just had to try. As a plus, cilantro came in my CSA share this week!

Ingredients:

  • 1 garlic scape, roughly chopped (or 2 cloves garlic)
  • 1/4 cup extra virgin olive oil
  • 1 14-oz. can of chickpeas, drained and rinsed
  • 1 teaspoon salt
  • 1/2 cup tahini
  • 1/2 bunch fresh cilantro
  • Juice and zest of 2 limes

Continue reading Cilantro Lime Hummus

Roasted Red Pepper Hummus

I think I’m on a hummus kick. Or maybe I’m feeling particularly lazy dinner-wise this week, and hummus is a quick and easy thing to make. Whatever the reason, it is hummus overload on this website. I have a good feeling no one is complaining though. One of the most appealing things about hummus is how versatile it is. Here is my version of roasted red pepper hummus.
Ingredients:
1 (15 ounce) can chickpeas, drained
1/3 cup tahini
The juice and zest of 1 lemon juice
1 jar of roasted red peppers (about 3 peppers)
1 garlic scape, chopped (or 2 garlic cloves)
1/4 teaspoon cumin
Salt and pepper to taste
For dipping:
Grape tomatoes
Pita bread
Cucumber

First, prepare your red peppers. Remove the peppers from the jar. Take two of the peppers and roughly chop. You will use these in the actual hummus. Finely chop the remaining red pepper as a topping for the hummus. Set the finely chopped red pepper aside.
Combine everything (chickpeas to salt and pepper) in a food processor.
Blend until smooth.
Top with some of the remaining red pepper. Serve with pita, cucumber slices, or tomatoes.
Roasted red pepper hummus is one of my favorite. It always ends up tasting so smooth and creamy, it makes me so happy.  The tiny addition of cumin gives a light heat to the hummus which I really enjoy. If you’re not a fan, feel free to omit the cumin. I loved the scapes in this hummus. Raw minced garlic can sometimes be overbearing in hummus, so the subtlety of the scapes was perfect.

Truffled Roasted Potatoes

I was so excited to receive red potatoes in my CSA share this week. I love roasted red potatoes with fresh herbs, but I had a little bit of white truffle oil left that I wanted to use. I found this recipe for Truffled Roasted Potatoes from Cooking Light which sounded delicious.

Ingredients:
1 small container of red potatoes, washed and quartered
2 tablespoons olive oil
2 garlic scapes, chopped
Salt and pepper, to taste
1 tablespoon white truffle oil
1 teaspoon each of chopped fresh thyme leaves, sage leaves, and rosemary

Preheat your oven to 450 degrees. Wash your red potatoes thoroughly, but gently. (The skin of red potatoes is fragile). I used a little brush to lightly buff off the dirt under warm running water.

before
after

Cut the potatoes into wedges: quarters for the larger potatoes, and halves for the smaller potatoes, and arrange on a cookie sheet.

Drizzle olive oil over the potatoes and sprinkle with garlic scapes, salt and pepper.

Bake at 450 degrees for 30 minutes or until the potatoes are brown and slightly wrinkled.

While the potatoes are cooking, chop your thyme, sage, and rosemary. Combine.

Remove the potatoes from the oven, drizzle with truffle oil, and sprinkle with the herb mixture.

This was fantastic. I honestly couldn’t stop eating the potatoes. Truffle oil is such a great ingredient, although it is a bit of a splurge. Truffle oil is usually added at the end of a dish, the oil is too delicate to be subjected to high heat. A little bit of truffle oil goes a long way though so do not overpour! When I make this recipe in the future, I plan on using normal minced garlic (2-3 cloves), the garlic scapes were quite burnt from the oven so I didn’t get any of the garlic taste from them. Boo.

Gazpacho

The warm days in Philadelphia keep on coming, so I think it’s time to attempt making the summer favorite: gazpacho. I wanted to do an heirloom gazpacho, but I am presently cooking out of Wilmington and the local store does not carry any. Sigh. I used this recipe from Cooking Light and just changed some of the ingredients to fit what I could find in the store.
Ingredients:
2 seeded peeled cucumbers, plus 1 for garnish
1 chopped Vidalia or other sweet onion
1 coarsely chopped red bell pepper
6 tablespoons white wine vinegar
1 tablespoon extravirgin olive oil
1/2 teaspoon salt
1/4 teaspoon freshly ground black pepper
6 large tomatoes, chopped seeded & peeled
1 garlic clove, minced
1 finely chopped yellow pepper, for garnish
1 finely chopped orange pepper, for garnish
1 finely chopped tomatillo, for garnish
8 pieces of garlic bread (optional)
To begin, prepare all of your ingredients. Peel and seed 2 cucumbers. To learn how to seed a cucumber, check out my post here. Roughly chop the onion and red bell pepper. To peel a tomato, prepare a bowl with ice water and bring another pot of water to a boil.
On the bottom side of the tomatoes, cut an X into the skin.
When the water is boiling, place 2 tomatoes at a time into the water.
Keep in the water for 15 to 20 seconds, remove, and place in the ice water.
Once cooled, use a knife to peel away the skin from the X.
Repeat with remaining tomatoes.
To seed the tomato, cut the tomato in half and use a spoon to scoop out the seeds. Discard the seeds and roughly chop the tomatoes.
Prepped Veggies
To make the gazpacho, combine first 9 ingredients (up to the garlic).
Add 1/3 of the mixture to a food processor and blend until smooth. Pour into a large bowl and repeat with the remaining 2/3 vegetable mixture. Cover and chill.
When ready to serve, spoon gazpacho into bowls. Finely chop your yellow and orange peppers and tomatillo. Combine the peppers and tomatillo.
Add 2 tablespoons of the mixture to each bowl. If you’d like, you can also add a piece of garlic bread (or just a crusty piece of day old bread), 1 tablespoon goat cheese, or a teaspoon of sour cream.
This would also be a nice appetizer. Pour the gazpacho into shooter glasses and top with a teaspoon of the pepper tomatillo mixture.
You can also use the gazpacho as a pureed salsa. Prepare garlic bread. Put on a plate with a bowl of gazpacho in the center with a spoon. Guests can spoon gazpacho on top of the bread, or use the bread to dip into the gazpacho.

Vegan Roasted Brussels Sprouts, Butternut Squash and Apple with Candied Walnuts

New York Times recently had an article with a recipe from Carmen Quagliata, the executive chef at Union Square Café. The recipe was for a perfect winter dish: Vegan Roasted Brussels Sprouts, Butternut Squash and Apple with Candied Walnuts. Usually when searching for Brussels sprouts recipes, bacon is almost always included, so I was happy to find a somewhat healthy alternative.  I thought Ash Wednesday would a great to try out this recipe for dinner.
Ingredients for Brussels sprouts:
1 ½ cups Brussels sprouts, trimmed, halved
2 cups butternut squash, peeled and cut into 1-inch asymmetrical chunks
2 cups (about 1 large) Honeycrisp, Cortland, or Granny Smith apple, cored and cut into 1-inch asymmetrical chunks (my local market was out of these options so I used two Pink Lady apples)
1 shallot, cut crosswise into 1/4-inch slices
2 tablespoons olive oil
5 fresh sage leaves
Salt and freshly ground pepper
½ tablespoon maple syrup
Preheat the oven to 375 degrees. While it is heating up, prep your Brussels sprouts, butternut squash, apples, and shallot. To trim the Brussels sprouts, cut off the rough white stem and then cut the sprout in half. If any outer leaves fall off discard them as well.
This was my first attempt at cutting and peeling a butternut squash, and I found the blog A Veggie Venture  to be super helpful. The blog has a lot of great tips about veggies in general, so I suggest checking it out. If you’re not up for cutting your own butternut squash, Trader Joe’s sells already cubed pieces. However, they are a bit more dried out than freshly cut squash so keep that in mind.
I only needed the top half of the butternut squash
 I used an apple corer to prepare the apples, and then cut the slices in half.
Keep the skins on the apple
Toss the Brussels sprouts, butternut squash, apple, and shallot with the olive oil and sage leaves in a shallow baking dish.
So many colors!
Season with salt and pepper.
Bake at 375 until vegetables and apple are wrinkled and slightly brown, about 45 minutes to an hour. Do not disturb or mix the dish while it’s cooking.
If you don’t have time or are just apprehensive about making the candied walnuts, you can purchase them already made.
However, the recipe is below in case you’re feeling adventurous. (Honestly, it wasn’t that difficult!)
Ingredients for walnuts:
6 cups vegetable oil
6 ounces walnut halves
2 cups confectioners’ sugar (I ended up using less than a cup and they were fine)
kosher salt
To make, place a deep fryer or high-sided saucepan over high heat (I ended up using my pasta pot; my saucepans were all dirty from previous cooking adventures). Add the oil making sure there is at least 3 inches from the top of the pot. (When the walnuts are added, the oil bubbles and rises so you need room for this to happen) Heat to 375 degrees.
Bring 4 cups of water to a boil in another pot. Add the walnuts and boil for 10 seconds. Drain well and immediately toss with confectioners’ sugar. Spread flat on a baking sheet to allow to dry.
Walnuts after tossed in powdered sugar
 The original directions suggest having a baking sheet lined with paper towels nearby. Mine stuck to the paper towels (boo) so I’d suggest maybe using parchment paper. Working in batches if necessary, add the walnuts to oil and stir once or twice. Fry until amber-brown or about 30 seconds. Using a wire skimmer or a heatproof slotted spoon, remove walnuts and move to baking sheets. Sprinkle with salt and allow to cool for about 5 minutes.
To serve, drizzle maple syrup over roasted vegetables and sprinkle with walnut pieces.
How good does that look??
 This dish was really great. It had the feel of a comfort food dish without the leftover heaviness.
I was sort of hoping the Brussels sprouts would play a bigger role in the dish, but the butternut squash was what I kept going back for (nothing wrong with that). The walnuts add a lot of sweetness to the dish so don’t go overboard on topping the dish with them. The best part though, was that with so much flavor, I didn’t even miss not having meat for dinner!
Note: If you want something to pair with this to make a more hearty meal, the recipe suggests serving it with walnut bread.

Wilted Spinach with Garlic Vinaigrette

Most sides are a bit of an afterthought. I tend to just whip something up really quick to give my dish more color, or to make me feel like I’m being healthy because there is some green on my plate.  But this Wilted Spinach with Garlic Vinaigrette side dish is so good, I’d be happy to have just this for dinner.  I am not the biggest fan of mustard in general, but the small amount of Dijon mustard really ups this side from good to great.
Ingredients
1 ½ tablespoons extra virgin olive oil
1 tablespoon white wine vinegar
½ teaspoon Dijon mustard
¼ teaspoon freshly ground black pepper
1/8 teaspoon salt
3 garlic cloves, minced (or thinly sliced, whatever makes you happy)
6 cups baby spinach leaves
¼ cup sliced red onion
To prepare the vinaigrette, combine the first 5 ingredients in a bowl (up to salt) combining with a whisk. Heat the vinaigrette in a sauté pan over medium-high heat. Add onion and garlic and cook for 2 minutes.  Gradually add the spinach (it will shrink up a lot!) and toss to combine. Remove from heat when wilted (1-2 minutes).
The spinach ended up stealing the show when I made it (I had a pasta/chicken dish along with it).  It was a very quick and easy side; I cannot wait to make this again!
Exit mobile version