Scarborough Fair Cornish Game Hens with Risotto

Do you remember the first recipe you learned how to make? One that was probably so simple, but made you so proud when you had completed the dish? Mine (besides grilled cheese) was a chicken recipe my mom referred to as “Chicken a la Simon and Garfunkel” based on the lyrics in their song Scarborough Fair:
Are you goin’ to Scarborough Fair? 
Parsley, sage, rosemary, and thyme.
Remember me to one who lives there, 
she once was a true love of mine.
I knew the song so I was able to help make dinner by seasoning the chicken and keeping my mom company while humming the tune to the song (which I have to assume was more of a distraction than a help.. I’m a truly awful singer and I’m sure that translates into a truly awful hummer as well).
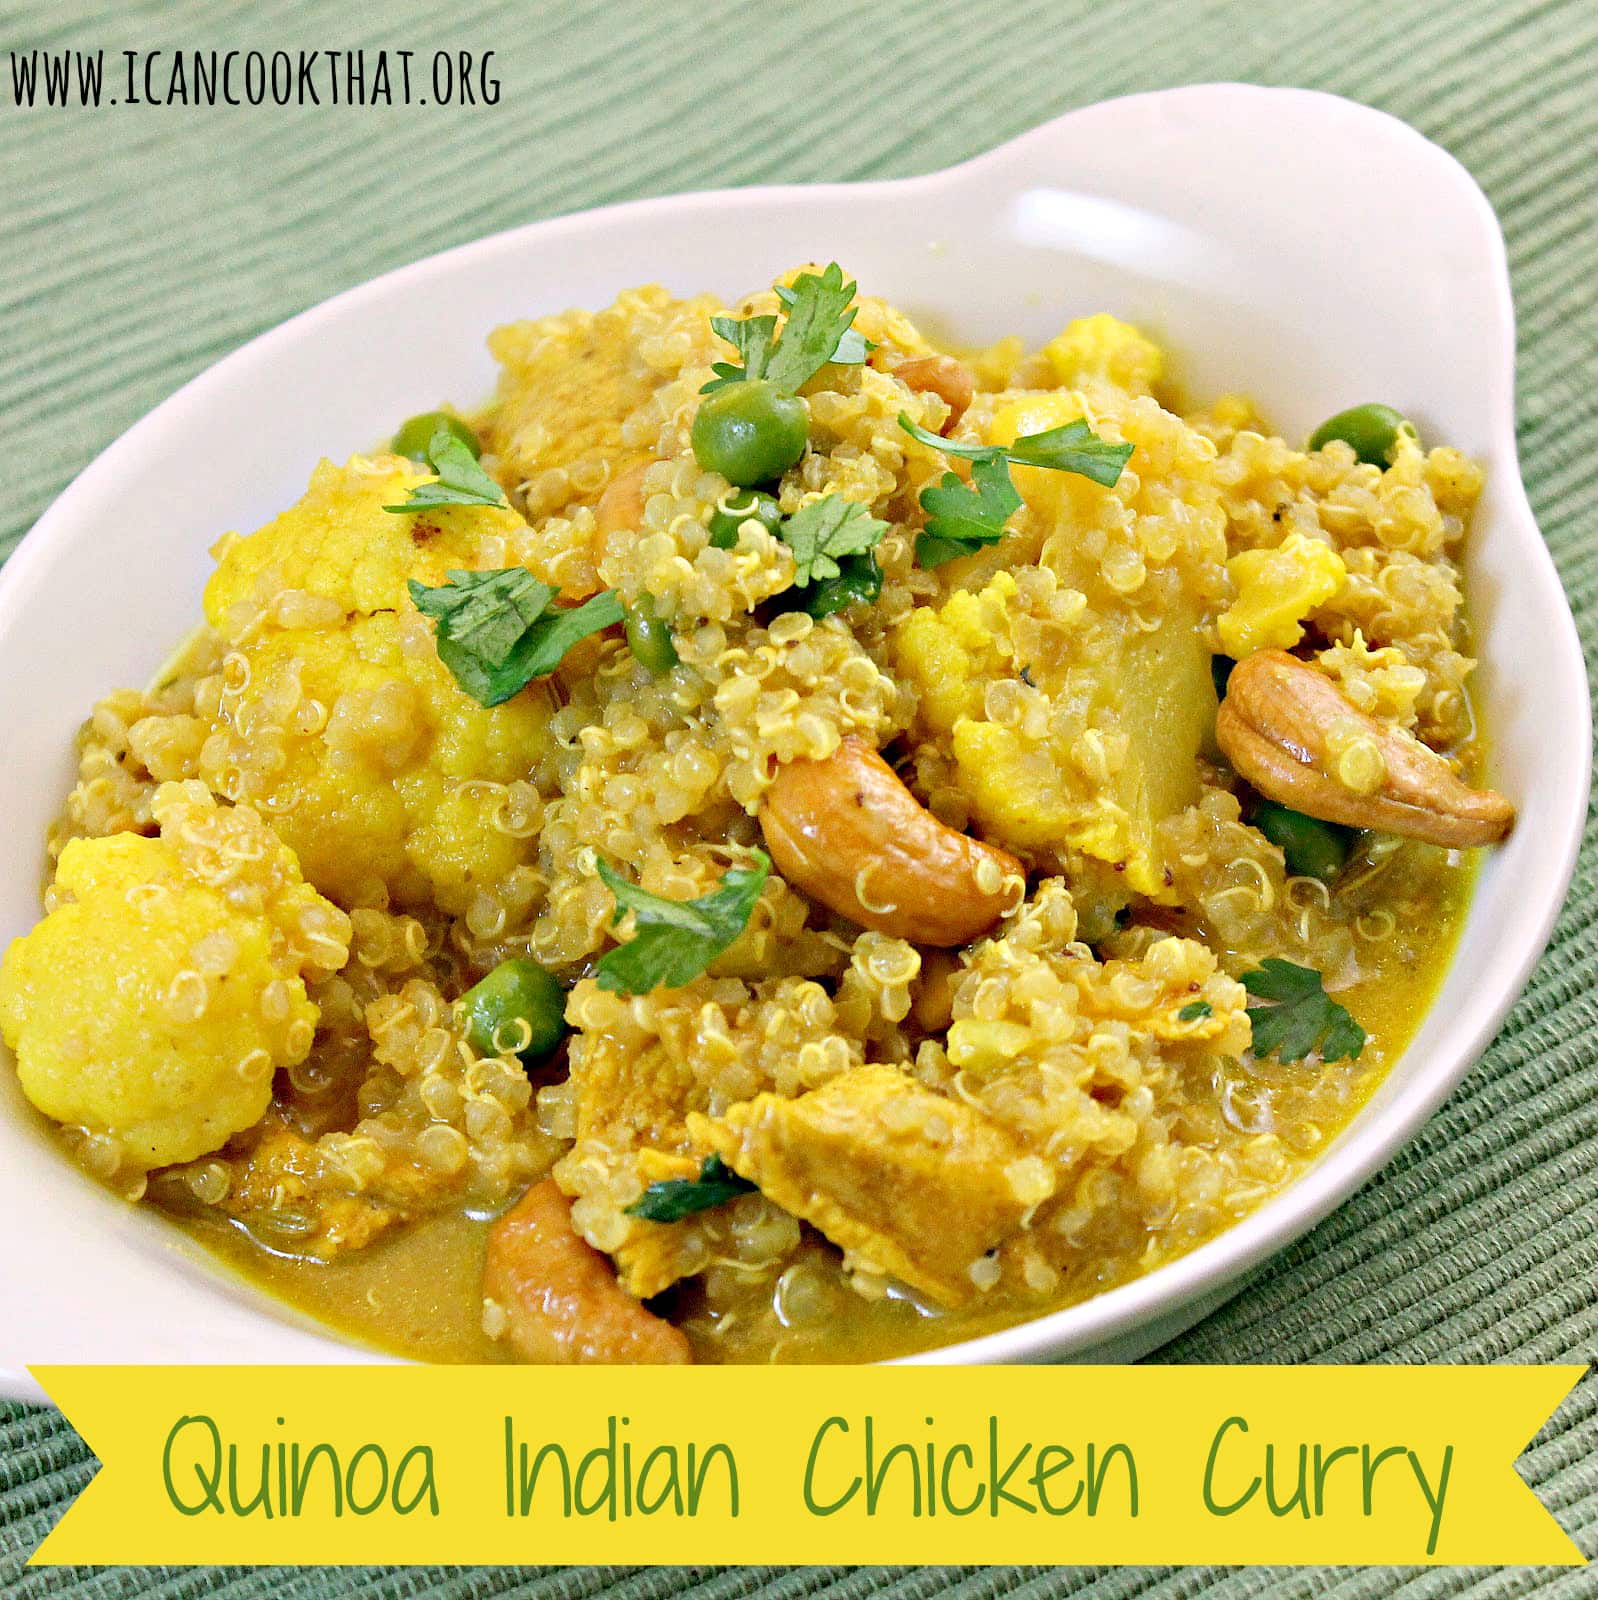
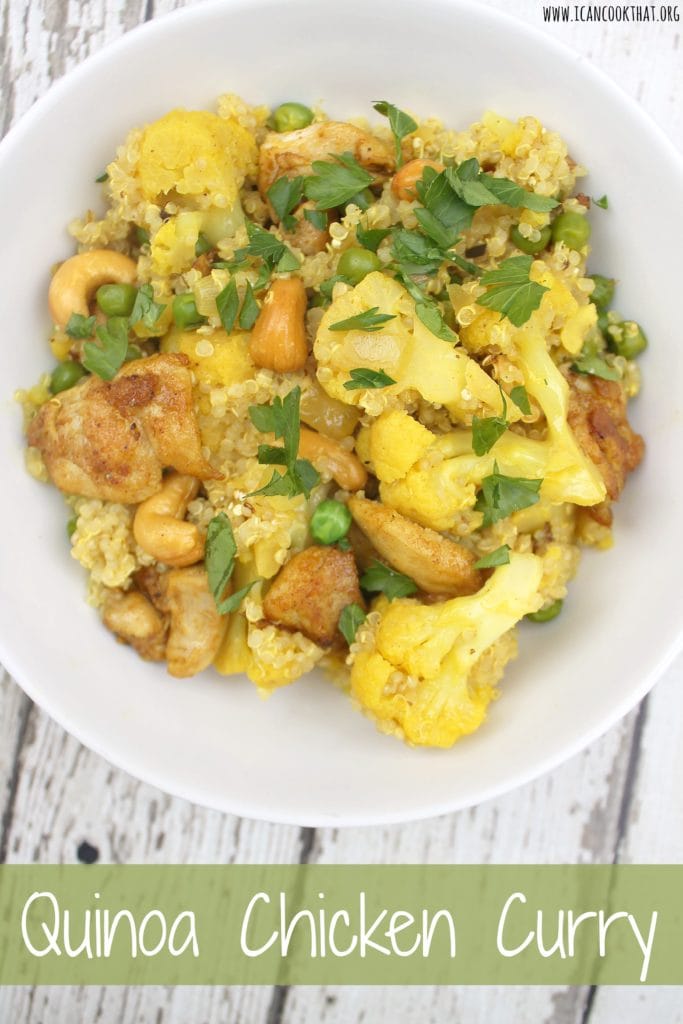
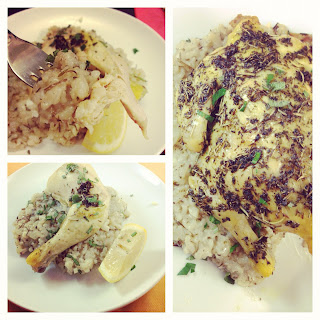
I figured this was as good as any time to learn how to roast a chicken. So I settled on Cornish game hens seasoned and stuffed with parsley, sage, rosemary, and thyme. I also made a “Scarborough Fair” Risotto to go with the chicken.
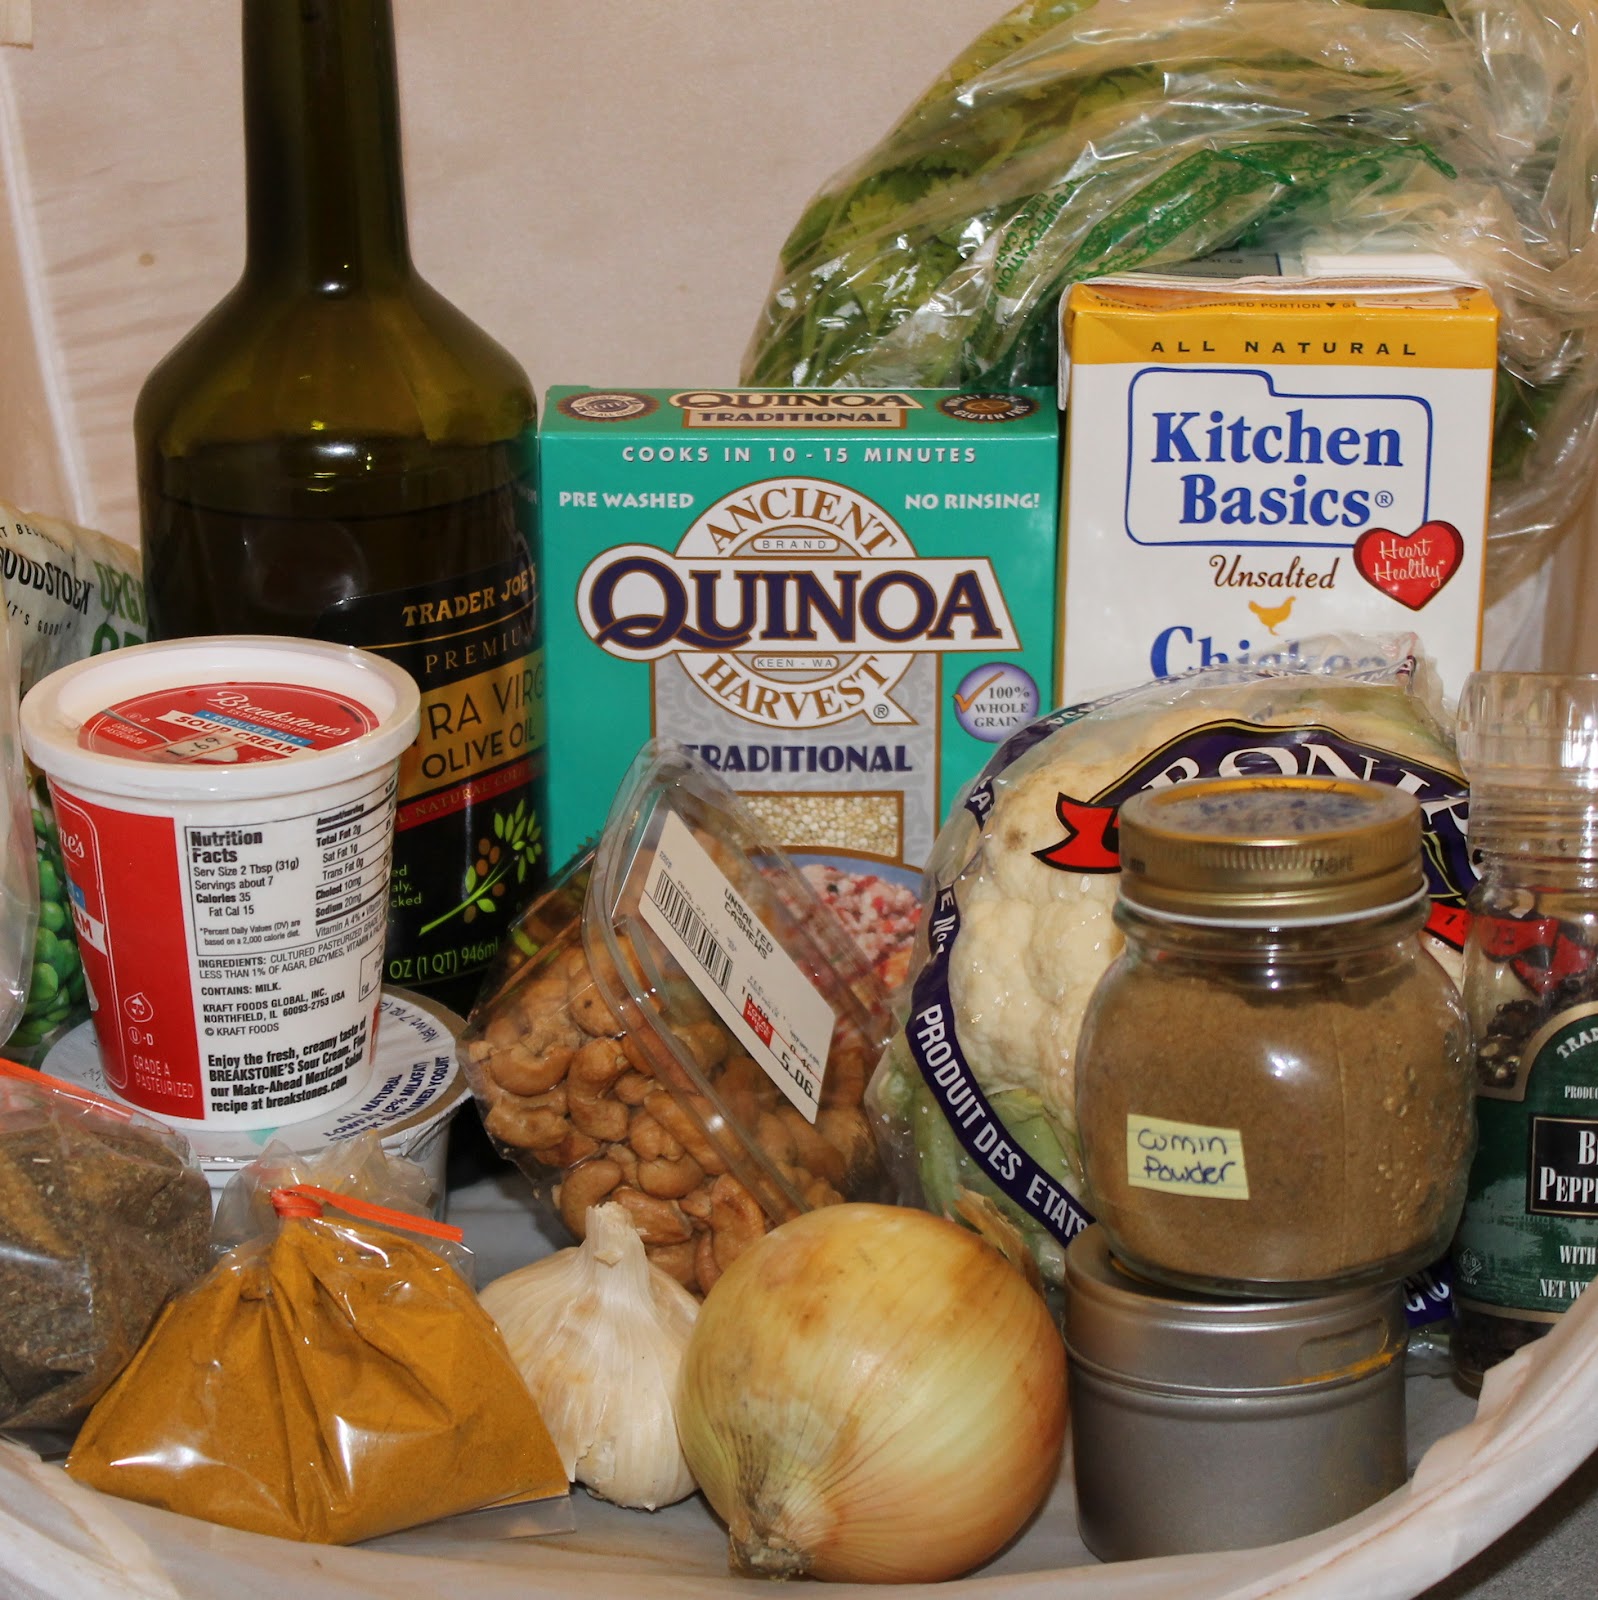
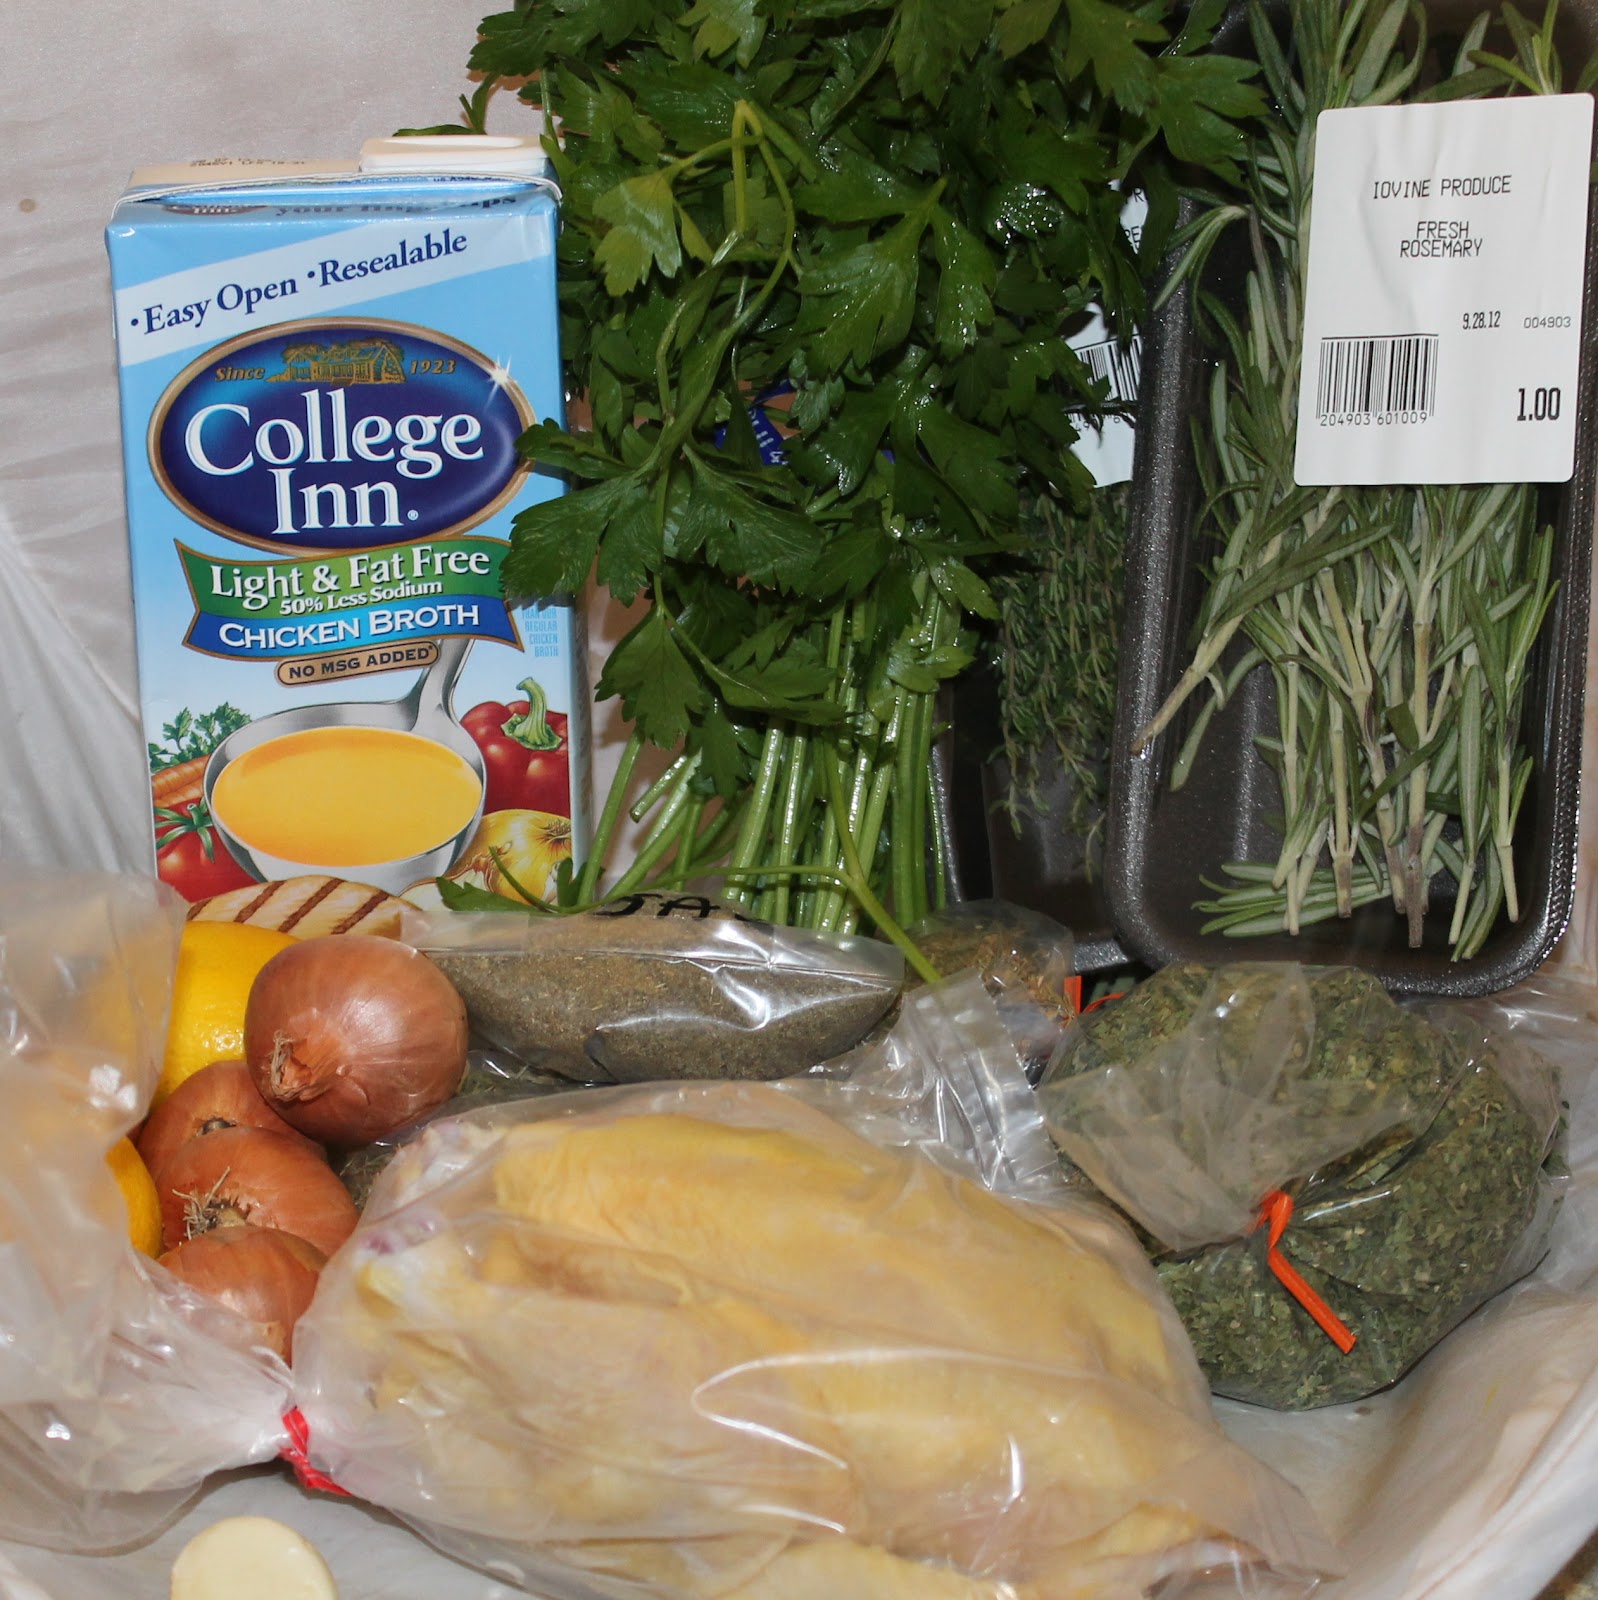
Ingredients: (I was making this for a family dinner but lowered the amounts to happily feed 2. Multiply as needed).
  • 2 Cornish game hens
  • 1 tablespoon each of dried parsley, sage, rosemary, and thyme (divided)
  • 2 tablespoons olive oil, divided
  • 1 lemon
  • 4 sprigs each of fresh parsley, sage, rosemary, and thyme
  • 6 small shallots, divided
  • 3 cloves garlic
  • 1/2 cup uncooked arborio rice
  • 1/2 cup dry white wine, divided
  • 2 1/4 cups chicken broth, divided
  • 1/3 cup grated Parmesan cheese (optional)

Continue reading Scarborough Fair Cornish Game Hens with Risotto

Salmon Teriyaki Stir Fry

 There is a good chance I have a rice problem, I love all things rice. My go-to meal in a pinch is always risotto. So when DailyBuzz Food had an opportunity to work with RiceSelect through their Tastemaker program, I jumped at the chance. RiceSelect is one of my favorite rice brands.  You may notice their nifty containers popping out of a bunch of my posts so I was really excited to work with their rice. The catch was that they sent me one of RiceSelect’s rice randomly, I didn’t get to choose it. When I opened up the package, I discovered brown rice. Hum. I’ve never worked with brown rice before, but I was up for the challenge!
I decided to make a stir fry teriyaki dish using my favorite protein, salmon. Normally stir fry is a quick dinner choice but brown rice takes quite a bit of time to cook. But it gives you plenty of time to prep your veggies and hang out with your dinner guests!
Ingredients: (I cut this recipe for Salmon Teriyaki Stir Fry down to two servings to make it easier. Multiply as needed)
  • 1/2 cup RiceSelect Texmati Brown Rice
  • 1 cup water
  • 1 tablespoon peanut oil
  • 1 medium yellow onion, chopped
  • 1 red pepper, chopped
  • 1/2 cup broccoli florets
  • 1/2 cup snow peas
  • 1/2 cup sliced water chestnuts (I used canned)
  • 1/2 pound salmon
  • 1/2 cup Teriyaki sauce, divided (recipe below)
  • 1/2 cup low sodium soy sauce
  • 1/4 cup water
  • 2 tablespoons rice wine
  • 1 tablespoon, plus 2 teaspoons brown sugar
  • 1/4 cup sugar
  • 1 1/2 teaspoons minced garlic
  • 1 1/2 teaspoons minced ginger
  • 1 tablespoon toasted sesame oil

Continue reading Salmon Teriyaki Stir Fry

Mini Orange & Cardamom Muffins

This weekend, I am co-hosting a Tiny Food Party with Bridges, Burgers & Beer, another Philly food blogger, using recipes from Teri Lyn Fisher and Jenny Park’s cookbook: Tiny Food Party. A bunch of the recipes we are making use mini muffin tins. I wanted to try out my new min muffin tins at least once before making food for the party, so I found this recipe for Mini Orange & Cardamom Muffins from a book I received last year and have used once before for a recipe (see it here) called 1 Mix, 100 Muffins.
The flavors of these muffins sounded absolutely delicious. It was a lot of prep though: you have to juice and zest the oranges for the recipe. It’s well worth it, the citrus-y flavor is perfect with the cardamom seeds.
Ingredients: (makes 48 mini muffins)
2 oranges
1/2 cup milk (maybe less)
6 whole green cardamom pods
2 cups all purpose flour
1 tablespoon baking powder
1/8 teaspoon salt
1/2 cup sugar
2 large eggs
6 tablespoons butter, melted and cooled

Begin by melting the butter over medium-low heat. Allow to cool.
Preheat your oven to 350 degrees. Line the mini muffin pans with paper liners.
Grate the rind from the oranges and juice the oranges.
Add the milk to the orange juice until you have 1 cup total of liquid. Add the orange rind.
Remove the seeds from the cardamom pods (I just cut into them and poured them out).
Combine the flour, baking powder and salt in a large bowl. Stir in the sugar and cardamom seeds.
Lightly beat the eggs in a separate bowl. Add the orange/milk mixture and the cooled butter.
Make a well in the center of the dry ingredients.
Add the wet ingredients to the dry and mix until just combined.
Spoon the batter into the muffin pans (I used a coffee scoop to measure them out, it worked really well).
Bake for 15-20 minutes or until risen and golden brown. Allow the muffins to cool in the pan for 5 minutes then transfer to a wire rack.
So the original recipe said to bake these at 400 degrees for 20 minutes. When I did that they turned out quite dark and slightly burned on the bottoms. (in the photo above, they are the ones in the background)
Next batch I tried at 400 degrees for 15 minutes. Not as browned but still too dark bottoms (that’s the one in the foreground of the above photo).  So I suggest trying 350 degrees instead, checking on them at 15 but probably baking for 20 minutes.
The muffins were wonderfully floral from the cardamom, which was balanced out by the citrus of the orange. I’m glad these were mini muffins, if not I’d probably consume at least 2 normal sized versions, I loved how they tasted!
I will have a post about the Tiny Food Party in the coming days so stay tuned!

Osso Buco with Gremolata

As soon as the weather begins to move into fall, I begin to think of all the hearty meals I will be making in the upcoming months. A slow cooker is such a helpful tool during colder months, it allows you to make a bunch of servings all by dropping them in a pot and just waiting. Slow cooking tough cuts of meat also turns them into the most tender fall-off-the-bone protein. I’ve never tried osso buco before, but a slow cooker version sounds basically idiot proof, so I decided to make it. I actually put this together Sunday night and when I woke up the next morning, spooned out a portion for lunch that day and froze the rest. What a great way to start the week!
I had a heck of a time finding some ingredients despite them being pretty common. So I kind of fudged some of the ingredients. For the original recipe, check it out here.
Ingredients:
  • 2/3 cup all-purpose flour
  • ¾ teaspoon ground black pepper, divided
  • ½ teaspoon kosher salt, divided
  • About 5 pounds veal (go for the cheaper cuts—its usually made with veal shank but they were all out at my market – I used cubed veal and one veal loin chop so that there was some bone)
  • 2 teaspoons butter, divided
  • 2 teaspoons olive oil, divided
  • 2 cups coarsely chopped red onion
  • 1 ½ cups chopped celery
  • 6 garlic cloves, minced
  • 4 cups beef broth
  • 2 cups dry white wine
  • 1 tablespoon fresh rosemary
  • 1 tablespoon minced anchovy fillets (the original recipe calls for 1 tablespoon anchovy paste)
  • ½ cup chopped fresh parsley
  • 1 tablespoon grated lemon rind
  • 2 garlic cloves, minced
  • 8 cups cooked egg noodles

Continue reading Osso Buco with Gremolata

Kung Pao Chicken Tacos

I have no idea who decided that different foods should get taco-fied, but I am all for this movement. I love tacos, and Cooking Light comes up with the best taco recipes. These Kung Pao Chicken Tacos are everything I want in a meal: quick and easy to make, colorful, a hint of spice, and full of many ingredients I already had on hand.
Kung Pao chicken is a spicy stir-fry Chinese dish that includes peanuts, vegetables, chili peppers, and chicken. It is usually served over rice, but Cooking Light took some inspiration from Korean taco trucks and added the Kung Pao chicken to corn tortillas.
Ingredients:
  • 6 skinless, boneless chicken thighs, cut into bite-sized pieces
  • 3 tablespoons lower-sodium soy sauce, divided (or coconut aminos to make gluten free)
  • 1/4 cup plus 1 1/2 teaspoons cornstarch, divided
  • 1/4 teaspoon kosher salt
  • 2 tablespoons canola oil, divided
  • 1 1/2 tablespoons honey
  • 1 tablespoon dark sesame oil
  • 2 teaspoons rice vinegar
  • 1 teaspoon sambal oelek (ground fresh chile paste)
  • 1 large garlic clove, minced
  • 3 tablespoons coarsely chopped dry-roasted peanuts
  • 3/4 cup diagonally sliced celery (about 2 stalks)
  • 8 (6-inch) corn tortillas
  • 1/3 cup sliced green onions
  • 1/2 medium red bell pepper, thinly sliced
  • 4 lime wedges

Continue reading Kung Pao Chicken Tacos

Black Cauldron – An Adult Root Beer Float

Do you remember the first time you had a root beer float? I remember thinking “soda and ice cream, why hadn’t someone mentioned this deliciousness to me before this very moment?!” Mind you, I was a kid and probably didn’t need any more sugar or desserts in my life. But root beer floats always have such a wonderful feeling of nostalgia. I was at Franklin Fountain in Philadelphia recently. I saw that they sell root beer floats, and I haven’t been able to stop thinking about them since. So when this month’s Cooking Light arrived with what I can only call an “Adult Root Beer Float” I was so excited to try it out.
The drink, referred to as a Black Cauldron (it’s the October issue), is just as simple as a traditional root beer float, but it uses a stout instead of root beer. To add a little bit more flavor, the drink also has a touch of vodka and brewed espresso. How can you not like this drink?

Ingredients: (makes 4)
1 pint vanilla ice cream
1/4 cup vanilla vodka
1/4 cup brewed espresso (or coffee)
24 ounces stout beer (oatmeal, chocolate, whatever your favorite is)

Brew your espresso or coffee. Allow to cool.

Add 1/2 cup vanilla ice cream to each of 4 glasses.

Top each with 1 tablespoon vodka and 1 tablespoon espresso. (Note: espresso can make this drink very bitter. Feel free to use brewed coffee instead.)
Fill with the stout (it will get very frothy).
That’s it! What a great upgrade!
If you don’t like stouts, you are obviously not going to like this drink.  But as a stout lover, I couldn’t get enough of this drink. The ice cream melts into the drink, making it really creamy. On a couple of mine, it actually floated to the top!

Mushroom, Green Bean, and Farro Salad with a Poached Egg and Warm Bacon Vinaigrette

One of the highlights of the Kennett Square Mushroom Festival was catching a cooking demonstration by Antonia Lofaso of Top Chef. She made this wonderful mushroom and green bean salad with a poached egg and bacon vinaigrette. How fantastic does that sound? I didn’t have any arugula on hand, which was in Chef Antonia’s recipe, so I decided to sub in farro instead. (Farro is a grain that you cook like rice). I also kinda sorta forgot how she made most of the stuff, but it still turned out great. This is also the first time I’ve ever poached an egg because I’ve been terrified to do so but it was much more simple than expected!
Ingredients:
2 cups water
1 cup farro
1 garlic clove, minced
1 shallot, minced
8 ounces mushrooms, chopped (if you can, go for some wild mushrooms)
Salt and pepper, to taste
1/2 pound green beans, trimmed, and cut into bite sized pieces
3 strips bacon, finely chopped
3 tablespoons olive oil, divided
3 tablespoons apple cider vinegar, plus 1 teaspoon, divided
1 teaspoon Dijon mustard
4 eggs

Begin by cooking your farro. Bring the 2 cups water and 1 cup farro to a boil in a pot. Cover, reduce the heat, and cook for 20 minutes or until the water has evaporated.
Also bring another pot of water to a boil. Liberally salt the boiling water (Chef Antonia says that your water should “taste like the ocean”). While waiting for the water to boil, prepare your green beans and mushrooms. Add the green beans to the water for 3 minutes. Remove with a slotted spoon and reserve. Keep the water at a simmer (you’ll use it again soon).
Finely chop the bacon and add to a saute pan over medium high heat.
Cook until the bacon begins to brown and crisp.  Remove from heat, reserve the pan.
Add the olive oil, 3 tablespoons cider vinegar and Dijon mustard to the bacon and whisk to combine. Set aside.
Return the saute pan to the stove and heat 1 tablespoon olive oil over medium heat. Add the shallot and garlic and cook for 1 minute. Add the mushrooms and season with salt and pepper. Cook until the mushrooms give off some water and it evaporates. Remove from heat.
Combine the green beans, farro, and mushrooms.
To poach the eggs, add 1 teaspoon of the cider vinegar to the simmering water. Drop the eggs in one at a time.
Cook for 3 minutes and remove with a slotted spoon.
Top the green beans, farro, and mushroom mixture with the poached egg. Drizzle with the bacon vinaigrette.
The textures of this dish are fantastic. Farro has the texture of a more al dente rice, which was really nice with the crunchy green beans and the meaty mushrooms.
My poached egg, was a success! Look at that egg!
The bacon vinaigrette set this dish right over the top. Little bites of smokiness were an awesome touch. This is definitely a winning dish!

Potato and Wild Mushroom Soup

This past weekend was one of my favorite September events: the Kennett Square Mushroom Festival. That’s right, an entire festival dedicated to fungi. And it’s amazing. Kennett Square’s main street (State Street) shuts down to accommodate blocks of vendors, there are cooking demonstrations, soup contests, and mushroom eating contests. There is even pumpkin mushroom ice cream. All in celebration of the mushroom. (Fun fact: Kennett Square is considered the Mushroom Capital of the world).
Naturally, I picked up a bunch of mushrooms which I will now be using to cook all week. mmm. Because today was the first “fall” feeling day, I decided to use some of the mushrooms to make a soup. I wanted to stay away from a creamy soup so I used potatoes to thicken it up. I found the inspiration for this soup in The Flavor Thesaurus by Niki Segnit (one of my favorite books for food pairings).
Ingredients:
  • 2 tablespoons olive oil
  • 1 tablespoon unsalted butter
  • 1 garlic clove, minced
  • 1 yellow onion, chopped
  • 1/2 lb wild mushrooms, chopped
  • 3 cups vegetable stock (or chicken or beef stock)
  • 1-2 potatoes, peeled and chopped
  • 1 teaspoon rosemary
  • Salt and pepper, to taste

Continue reading Potato and Wild Mushroom Soup

Quinoa Chicken Curry

I’m excited to share with you this recipe for Quinoa Chicken Curry, but before I do, I wanted to share a bit about quinoa.
Although quinoa seems to be a bit of a “new” super food, it has actually been around for thousands of years and was considered one of the most important crops of the Incas. This grain-like seed is really easy to cook (you cook it like rice) but is chock full of nutritional benefits. Quinoa’s high protein content makes it a great choice for vegans and vegetarians. It is also a complete protein which means it contains all the essential amino acids. Quinoa is also rich in vitamins and minerals, including magnesium, phosphorous, zinc, iron, potassium, calcium, vitamin B, folate, and riboflavin. Quinoa is also naturally gluten free, and can be ground into a flour that allows for gluten free baking. Whew.
I really didn’t know much about quinoa, or how to use it. So I was excited to be given the chance to review The Complete Idiot’s Guide Quinoa Cookbook to learn more about it.  The book is full of quinoa recipes, including breakfast, dinner, and even dessert recipes. I wanted to try one of the more traditional preparations of quinoa, but can’t wait to delve into the more interesting uses for it in future posts (Lemon Poppy Seed Quinoa Cupcakes, anyone?) The book had a recipe for Quinoa Indian Chicken Curry that sounded absolutely fantastic!
Ingredients:
  • 1 cup uncooked quinoa, rinsed and drained
  • 4 cups chicken broth, divided
  • 2 boneless skinless chicken breasts, cut into 1 inch pieces
  • 4 tablespoons olive oil, divided
  • 6 teaspoons curry powder, divided
  • 1 medium yellow onion, chopped
  • 2 garlic cloves, minced
  • 1 cup frozen peas
  • 1 medium head cauliflower, chopped into 1 inch pieces
  • 1/2 tsp ground cumin
  • 1 tsp celery seed
  • 1/2 tsp fennel seed
  • 1/2 tsp turmeric
  • 1/3 cup plain low-fat yogurt
  • 1/3 cup nonfat sour cream
  • 1/2 cup cashews
  • 1/4 cup chopped fresh cilantro
  • 1/2 tsp salt
  • 1/2 tsp pepper
Yields 5 cups, or about 4 servings.

East Side Cocktail with Basil & How to Make Caraway Vodka

Whenever I have a cocktail, I tend to lean towards refreshing drinks, usually with gin. But while visiting friends in New York, we went to a cocktail bar that used caraway vodka in a drink. (Caraway has an anise flavor to it and is frequently used in baking. It is commonly used in rye bread and most versions of Irish soda bread.) So it adds a really nice earthy flavor to any drink. I decided to make my own to use in refreshing cocktails. I also used it to make a version of my favorite cocktail: the east side, which is essentially a gimlet. (Every drink seems to just be a variation of yet another drink).


Ingredients to make caraway vodka:
2 cups vodka (I used a cucumber vodka for more flavor)
2 tablespoons caraway seeds
Ingredients to make cocktail:
2 oz caraway vodka
1 oz lemon juice
1/2 oz simple syrup
1 basil leaf, chopped
ice
club soda

Making your own flavored vodka is really easy. Just take a jar and fill it with 2 cups vodka and 2 tablespoons caraway seeds. Allow to sit for at least a week. Strain and store for future use. I used cucumber vodka as a base which made a pretty awesome flavor combination.
A traditional east side uses cucumber and mint muddled together then mixed with gin, simple syrup, and lime and topped off with club soda. My version is just as refreshing, but uses some of summer’s other favorite fresh ingredients, lemon juice and basil, paired with my homemade caraway-cucumber vodka.
To make, add ice to a cocktail shaker and add the caraway vodka, lemon juice, simple syrup, chopped basil, and ice. Shake and strain into a glass. Top with club soda. If desired, garnish with a cucumber or a lemon twist.


You can also serve the drink on the rocks, which I prefer (the ice keeps it nice and cool to keep it super refreshing).


If you are a fan of more citrus over sweetness, omit the simple syrup. You can further customize the drink by muddling the basil before adding it to the drink to release more flavor into the cocktail.


Everything about this drink screams summer. I wish I had made the vodka earlier in the summer so I could have had this all season. Sigh.  Instead, it will just have to be my way to keep a little summer going on all year long!

Honey-Tomato Bruschetta with Ricotta

My CSA share this year has had plenty of tomatoes. Not that I’m complaining, I absolutely love them! But I’ve been running low on new inspiration for what recipes to use to highlight the tomatoes. I put out a request for yummy recipes that use cherry tomatoes on my Facebook page, and Katie H. suggested this Food and Wine recipe, which is a real winner. You slow roast the tomatoes to bring out the flavor and pair them with two types of honey and fresh ricotta cheese. mmm!
Ingredients:
2 pints cherry or grape tomatoes, halved lengthwise
1 1/2 tablespoons extra-virgin olive oil
2 tablespoons clover honey
2 teaspoons thyme leaves
1 teaspoon kosher salt
1/8 teaspoon freshly ground pepper
12 baguette slices, cut 1/2 inch thick on the bias
1 cup fresh ricotta (8 ounces)
1 tablespoon buckwheat honey
6 basil leaves, thinly sliced or torn

I wanted to go over the two different honeys used in this recipe. The tomatoes are tossed in the clover honey, which sweetens up the somewhat tanginess of the tomatoes. Clover honey is simply honey in which bees feed mainly on the nectar of clover plants.  Clover honey is mild, relatively inexpensive, and has a slight floral taste to it. The buckwheat honey is drizzled over the finished burschetta to bring out the flavor of the ricotta. Buckwheat honey is a darker amber colored honey that is produced by bees who feed mainly on the nectar of flowers on buckwheat plants. The flavor is similar to molasses and has a wonderful earthy flavor. (If you’re in the Philadelphia area, Bee Natural, located in Reading Terminal, has both honeys for sale).
This recipe is definitely not weekday friendly. You can roast the tomatoes beforehand and refrigerate up to 2 days to break up some of the time. Just bring the tomatoes to room temperature before serving.
To make, preheat your oven to 300 degrees. Line a cookie sheet with parchment paper.  In a large bowl, toss the tomatoes with olive oil, clover honey, thyme leaves, salt and pepper.
Add the tomatoes to the baking sheet, turning them cut side up.
Bake for 1 hour and 25 minutes or until they begin to shrivel. Allow to cool.
Preheat your broiler and add the baguette slices to a baking sheet. Broil for about 30 seconds on each side or until the edges of the bread are golden brown.
Add the ricotta to the baguette slices and top with the slow-roasted tomatoes.
Lightly drizzle with buckwheat honey and sprinkle with sliced basil.
I tend to be awfully impatient when it comes to making food, I want my meal prepared in under 40 minutes. So I’ve rarely attempt to slow roast, well, anything. But the flavor of a slow roasted tomato makes the wait time well worth it! (It also makes your kitchen smell fantastic)
The honey is a really nice addition and brightens up the flavors of the tomatoes. Creamy ricotta just finishes off the dish. The recipe is really simple (although time consuming) but would be a very welcome appetizer at any party.
Exit mobile version