Irish Brown Bread & Review of Mockmill Grain Mill

Note: I was sent the Mockmill Grain Mill for review. All opinions are mine alone.

I have dabbled in bread-making for this blog before. I’ve made beer bread, sourdough bread, soda bread, and even gluten-free bread in the past.

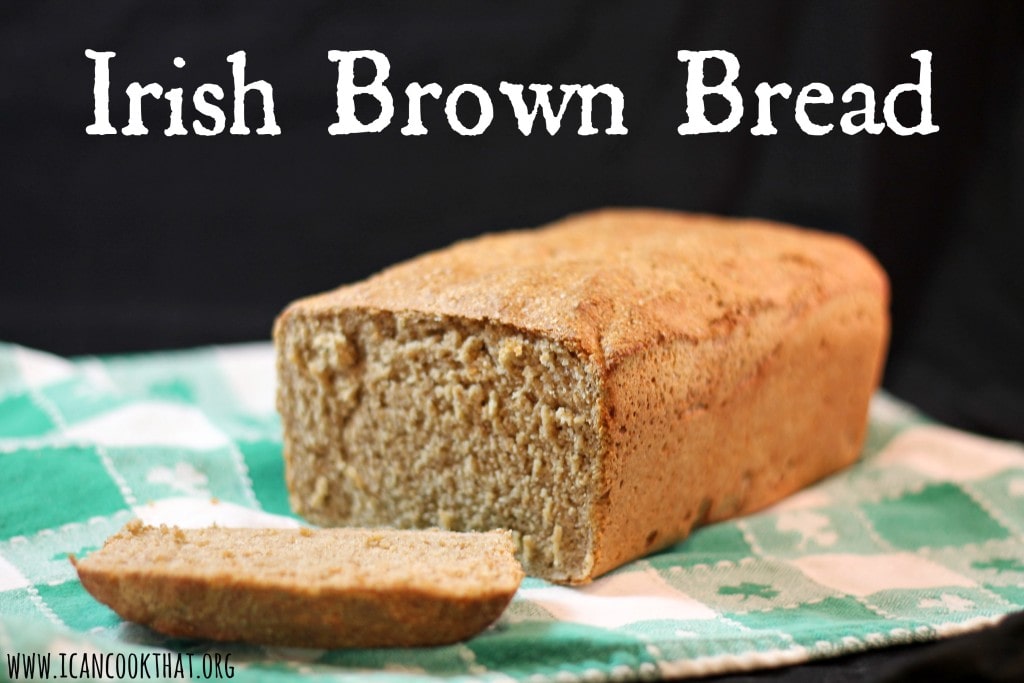
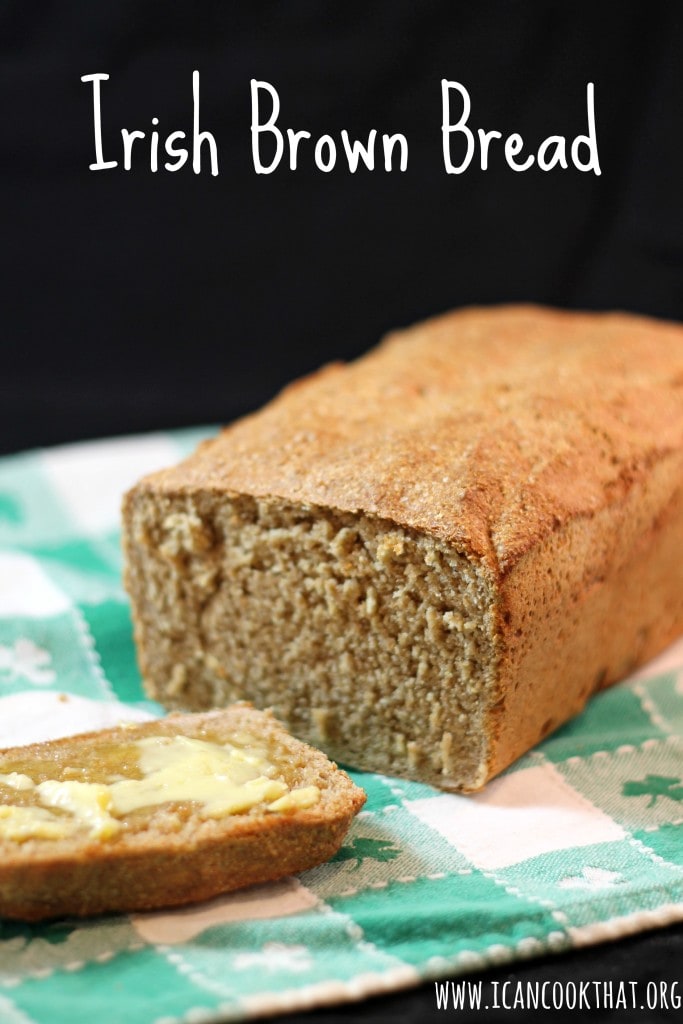
Since I returned from my honeymoon in Ireland a few weeks ago, I have been craving Irish Brown Bread like crazy. Served typically with breakfast, Irish brown bread is made with a coarse whole wheat flour, resulting in a hearty bread different than anything I can easily find here in the U.S.

The difference is really in the flour. To get the right consistency, you’d need to purchase a wholemeal flour, sometimes labeled as “Irish-Style,” which can be somewhat difficult to find (although it is available online.)

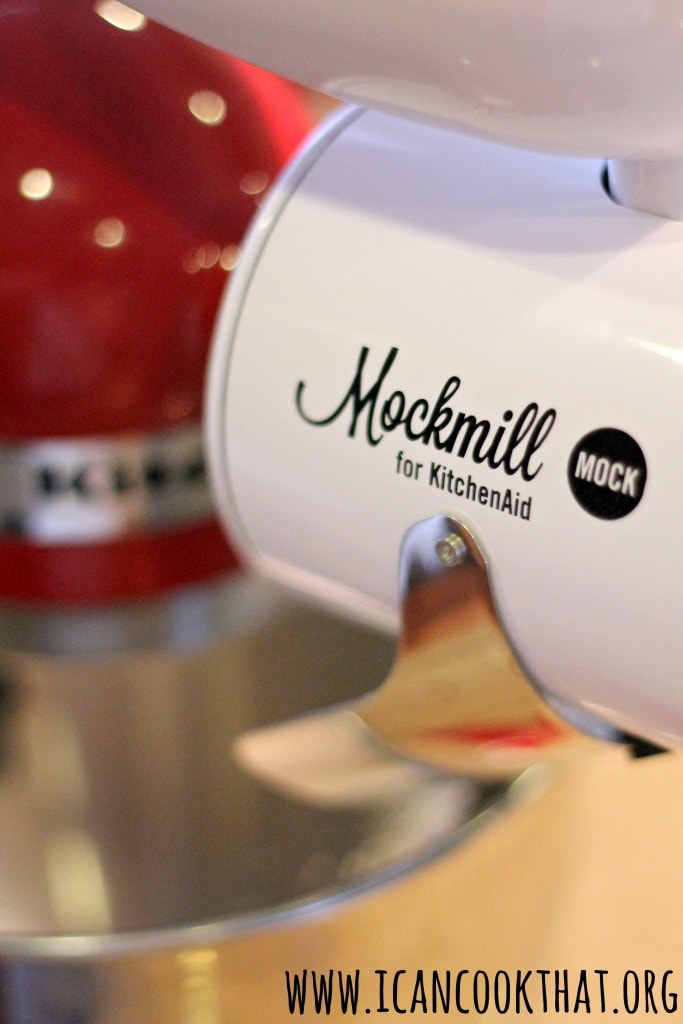
So when I was offered the chance to try out the Mockmill, a grain mill attachment for the KitchenAid Mixer, I jumped at the chance.  I can make my OWN Irish-Style flour!

Besides my very specific reason for wanting to mill my own flour, there are a bunch of other benefits to using a grain mill. Grinding from whole wheat berries at home means that the bran and germ stay in your flour. A bunch of the “good stuff” is found in the bran and germ: fiber, vitamins, minerals, antioxidants. However, the germ is removed from commercial flour because it reduces its shelf life; the oil in germ can turn rancid, so home milled flour should be used in 1-2 weeks, or stored in the freezer.

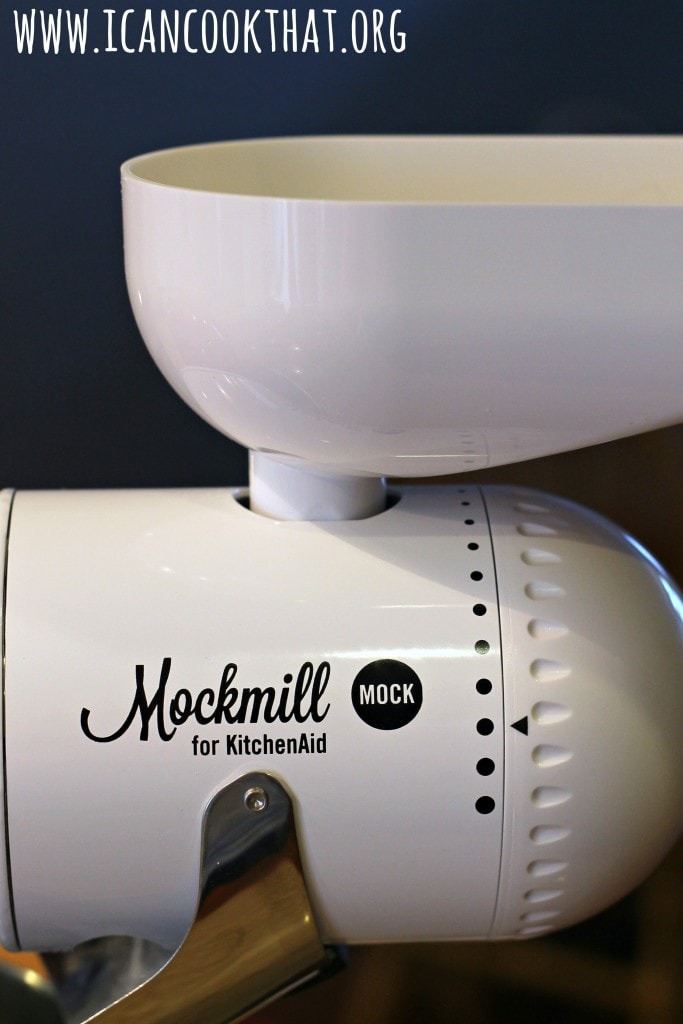
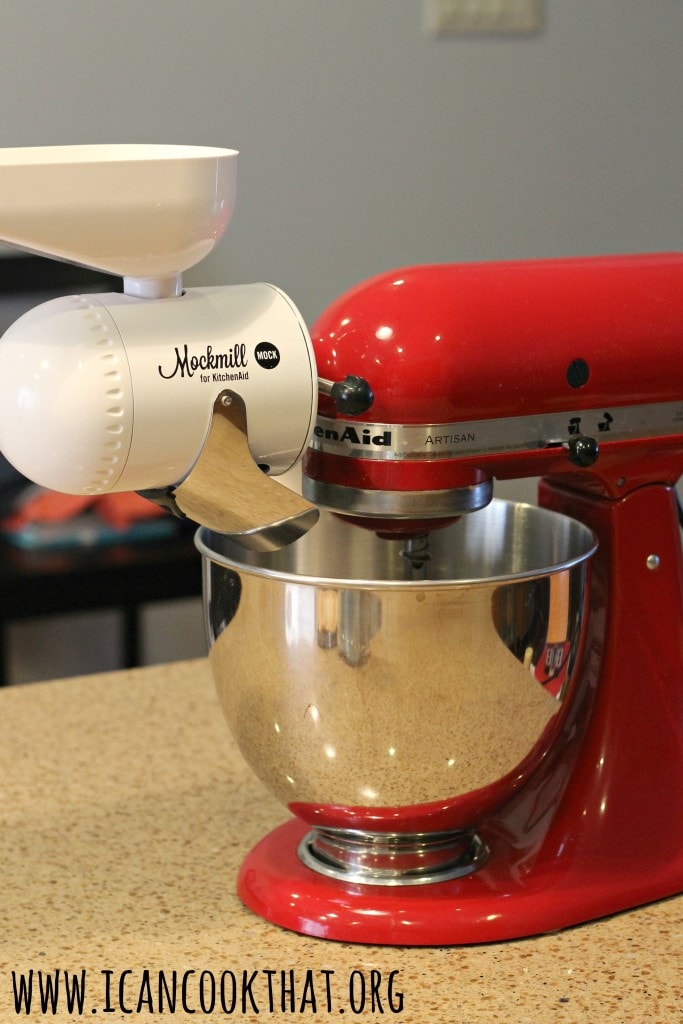
The Mockmill, designed by Wolfgang Mock, is nicely compact. (As a city dweller, I very much appreciate this.) I love that it attaches right to my stand mixer; it’s really simple to set up and begin using right away.

source: Mockmill

You adjust the coarseness of the grind by twisting the front of the mill. The mill uses self-sharpening ceramic-bonded corundum grinding stones, which can produce a very fine flour if needed.

The Mockmill grinds flour directly into the mixing bowl, really convenient if you’re using it immediately like I am!

Cleaning the Mockmill is also a breeze; the mill can be separated easily and rinsed to clean any minimal residue left from milling.

Mockmill is offering I Can Cook That readers a really sweet deal, available until August 31: $80 off (that’s over 30% off!) two different package options through this link if you use the code icancookthat. 

The packages come with everything you need to begin milling at home: the Mockmill Grain Milling Attachment for Stand Mixers,  a variety of whole grain berries to get you started, plus “Flour Power” by Marleeta Basey, a comprehensive introduction to the benefits of home milling! Be sure to check them out here.

Note: the price listed is the original price. Add the code icancookthat at checkout to receive $80 off. The sets of books, grains, and Mockmills are being especially made for this promotion so delivery times may vary.

To test out the mill (and make me some oh so yummy brown bread,) I decided to start with a relatively simple version of Irish bread, a yeasted version from the Ballymaloe House in County Cork, Ireland. This version of their recipe comes from David Lebovitz, and is super easy to make.

So let’s test this mill out!

Ingredients:

  • 3 cups freshly ground whole-wheat flour (~2 cups red wheat berries)
  • 1/2 cup all purpose white flour
  • 1 teaspoon salt
  • 1/2 cup plus 1 1/2 cups tepid water
  • 1 tablespoon dark molasses
  • 2 1/2 teaspoons active dry yeast

Continue reading Irish Brown Bread & Review of Mockmill Grain Mill

Grilled Peach Old Fashioned Cocktail

Note: I was sent a Coyote Outdoor Grill to participate in the #CoyoteChallenge. All opinions are mine alone.

I am absolutely loving my Coyote Outdoor Grill; I have been grilling anything and everything I can find! To see some of my other recipes I’ve made using my beloved grill, check them out here. This time, I wanted to branch out and find recipes that you may not necessarily consider making on the grill.

I found this awesome recipe for a Grilled Old Fashioned from Damaris Phillips (Food Network). How does one grill a cocktail? Well, you grill the fruit that goes into it!

I kept to the recipe for the most part, but added in some peaches for extra flavor because my husband loves all things peach and ended up with this recipe for Grilled Peach Old Fashioned Cocktail. I also substituted in Rye Whiskey to suit our personal tastes. Feel free to use your favorite bourbon of choice instead.

My friends and I loooooove Old Fashioned’s so I was thrilled to find a new version of our favorite cocktail. I make a mean Fizzy Old Fashioned that is a perfect “punch” for groups of friends; it’s not nearly as strong as a typical Old Fashioned, but the bourbon taste is still very present.

Ingredients:

  • 1/2 orange, cut into slices
  • 12 pitted cherries
  • 1 peach, cut into quarter slices, with the stone removed
  • Cooking Spray
  • 5 tablespoons turbinado sugar (such as Sugar in the Raw)
  • 3 dashes bitters
  • 1 (750-ml bottle) rye whiskey (such as Bulleit Rye)
  • 1 liter club soda, cold or  blood orange soda, cold
  • ice

A quick note for my gluten-free friends. Rye whiskey, obviously derived from rye, is gluten-free. The distilling process removes the gluten proteins. So drink away!

Continue reading Grilled Peach Old Fashioned Cocktail

Blackberry Syrup & Watermelon Blackberry Granita

Today (July 22nd), Ball brand is hosting it’s sixth annual Can-It-Forward Day. (You may recall my last post on Can-It-Forward Day, where I canned on my own for the very first time to make salsa.) Can-It-Forward day is a day to celebrate the joys of fresh preserving, and encourage both new and veteran canners to preserve more. This year, the day will be streamed online via Facebook Live from 10:00 am 3:30 pm EST. Throughout the day, the Ball brand and expert ambassadors will be demoing a variety of canning recipes. In the true spirit of “canning it forward,” for every engagement received on the videos, whether it be a comment, like or share, the brand donate $1 to a local charity, so be sure to check it out!


You can also ask Jarden Home Brands canning experts any preserving or home canning questions via Twitter with the hashtag #canitforward from 10AM – 5PM ET on July 22nd. Share your own #canitforward creations with the brand on Pinterest and Instagram as well!

Ball brand has also launched the Freshly Preserved Ideas Tumblr page, a “digital pledge page” a place for consumers to take the pledge to Can-It-Forward this year. Check it out and pledge!

To celebrate, I was sent The All New Ball Book of Canning and Preserving, a Case of Collection Elite Wide Mouth Pint Jars, one $5 off coupon to be used on FreshPreservingStore.com.

I really loved the new canning book from Ball; along with canning and preserving recipes, there are many recipes that incorporate the canned/preserved items.

source: freshpreserving.com/

I wanted to show off how great both types of recipes found in the book are, so I made a blackberry syrup to can, and used it in a watermelon blackberry granita.


The blue wide mouth pint jars are SO PRETTY. I have been using a set of the regular mouth blue pint jars as my drinking glasses for years so I was excited to use the wide mouth for their actual intended use!

source: freshpreserving.com/


I will get to the canning and recipes shortly, BUT Ball brand was also kind enough to provide a second set of the products I received as a giveaway to my readers! Details on how to enter will be at the end of the post!

Ingredients:

For Blackberry Syrup:

  • 3 lbs blackberries
  • 2 cups water
  • 2 3/4 cups sugar
  • 1/4 cup honey
  • 2 tbsp bottled lemon juice

For Watermelon-Blackberry Granita:

  • 8 cups seeded watermelon cubes
  • 1/2 cup Blackberry Syrup
  • 2 tbsp fresh lime juice

Gear:

  • stainless steel or enameled Dutch oven
  • wire-mesh strainer
  • 3 pint jars, lids, and bands
  • large pot for canning + a rack to keep the jars off the bottom of the pot
  • cheesecloth
  • 13×9 inch baking dish

So, since my last post, I’ve upgraded my canning situation to the Ball Fresh Preserving Kit. However, for beginners, you really can’t beat the value of the Beginners Kit that I used last year to make the salsa. On to the recipes!

Continue reading Blackberry Syrup & Watermelon Blackberry Granita

Pumpkin Curry Chicken with Potatoes and Peas

Note: I was sent two jars of Herb ‘n Zest Cooking Sauces in order to make this Pumpkin Curry Chicken with Potatoes and Peas. All opinions are mine alone.

As someone who works full-time, my biggest requirement for a dinner option is that it can be made in under 40 minutes. By the time I get home, I’m ready to eat! Although it’s not usually too much of a problem, I rarely get the chance to make dinners with the depth of flavor brought to food when it is simmered over a stove for a while.

A local Philadelphia company, Herb ‘n Zest, is changing that. Their innovative condiments and sauces allow home cooks to add quick flavor to meals in no time. All products are fully cooked and can just be added to dishes as sauces or dips.

I was sent a jar each of Herb ‘n Zest’s two most popular sauces: Chive Tomato Cooking Sauce and Curry Pumpkin Cooking Sauce. The Chive Tomato Cooking Sauce is made with Jersey Fresh tomatoes sauteed with chives and spices in olive oil. while the Curry Pumpkin Cooking Sauce is a savory pumpkin sauce seasoned mildly with curry and sunflower seeds. Both sauces are also vegan, soy-free, gluten-free, dairy-free and use non-GMO ingredients.


I love love love pumpkin, so I knew I had to try that one first! I decided to make a chicken and potato curry with the sauce and serve it over coconut rice, resulting in this recipe for Pumpkin Curry Chicken with Potatoes and Peas. To make vegetarian/vegan, omit the chicken.

Want to try the sauces for yourself? Herb ‘n Zest is offering a great discount through my blog: 25% off the Home Chef Starter Pack with the code get25icancook! Just click the photo of the jars below and enter the code at checkout!

Buy 6 Jars of Cooking Sauce (Home Chef Starter Pack)

You can also enter their summer giveaway worth $50. Just take a picture of yourself with a jar of Herb 'n Zest, upload it to Instagram & tag the image with #herbnzest. The summer giveaway draw will happen on August 15, 2016, so be sure to purchase your jars soon!

Ingredients:

  • 2 russet potatoes, peeled and cut into bite sized pieces
  • 1 cup uncooked basmati rice
  • 1 (13.5 oz) can coconut milk
  • 1 tablespoon olive oil
  • 1 medium sized onion, chopped
  • 1 lb boneless skinless chicken thighs, cut into bite sized pieces
  • salt and pepper, to taste
  • 1 (12 oz) bag frozen peas
  • 1 (16.75 oz) jar Herb 'n Zest Curry Pumpkin Cooking Sauce

Continue reading Pumpkin Curry Chicken with Potatoes and Peas

Grilled Caesar Salad

Note: I was sent a Coyote Outdoor Grill to participate in the #CoyoteChallenge. All opinions are mine alone.

If you’ve never had Grilled Caesar Salad before, you’re in for a treat! This variation on the classic adds a bit of smokiness from the grill. I added in some grilled tomatoes as well, because who doesn’t love tomatoes?

The dressing for this recipe is Greek-yogurt based, so its slightly tangy and perfect with the charred bits of romaine lettuce. I found the dressing recipe on myrecipes.com.

Ingredients:

For the dressing:

  • 3 tablespoons plain 2% reduced-fat Greek yogurt
  • 2 tablespoons grated Parmesan cheese
  • 4 teaspoons fresh lemon juice
  • 1 tablespoon water
  • 2 teaspoons extra-virgin olive oil
  • 1 1/4 teaspoons Worcestershire sauce
  • 1 teaspoon Dijon mustard
  • 1 anchovy fillet, finely chopped (can omit to make vegetarian)
  • 1 small garlic clove, minced
  • 1/4 teaspoon ground pepper

For the salad:

  • 2 romaine hearts, halved lengthwise
  • salt and pepper, to taste
  • the juice of 1/2 lemon
  • cooking spray
  • ~20 cherry tomatoes
  • 4 slices of a French baguette
  • shaved Parmesan cheese, if desired

Continue reading Grilled Caesar Salad

Grilled Corn with Chive Butter

Note: I was sent a Coyote Outdoor Grill to participate in the #CoyoteChallenge. All opinions are mine alone.

Last night, we finally broke in our snazzy new Coyote Outdoor Grill; it’s about time I started the Coyote Challenge! (Granted, I just got back from my honeymoon; it’s difficult to grill when you’re in a different country!) We had friends along for the adventure, so we made a few simple items to try out the grill.

Despite it being July, none of us had eaten corn on the cob yet! So naturally, we decided to make a quick grilled corn with an easy chive butter to test out the vegetable/fish grates. There isn’t much to it, so this recipe for Grilled Corn with Chive Butter was the perfect way to try out the grill for the first time.

We also shared a huge delicious piece of steak that Steve (our grill-master for the evening) had marinated first in an IPA (yum) and then transferred it into a more traditional herbed marinade (double yum). It was so juicy and delicious!

There were some other yummy grilling experiments that took place, but discussion of those are for another post. On to the recipe!

Ingredients:

  • 4 ears of corn, shucked
  • 1/4 cup salted butter, at room temperature
  • 1 tablespoon finely chopped chives, plus more for garnish
  • cooking spray, for the grill
  • salt, if desired

Continue reading Grilled Corn with Chive Butter

Exit mobile version